
Event Roster
The New Roster section handles various exam types for assessing or supervising written and skills tests, including Skills Exam, Virtual Skills Exam, Written Exam, CBT Exam, and Oral Exam. Its usual process involves onboarding, auditing, recording attendance, and proctoring or evaluating candidates. Additionally, you can view upcoming events scheduled for the next seven days in this section.
Note:
- Before beginning the exam, ensure to check in and onboard the candidates.
- Use Event Roster (New Roster) to view scheduled upcoming events as well as past completed events.
To view the New Roster page, follow these steps:
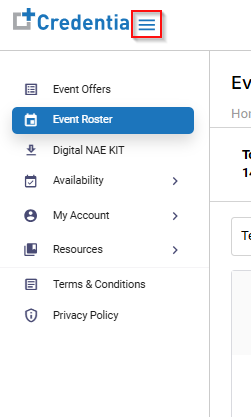
- In the left navigation menu, select the Event Roster option to view the New Roster.
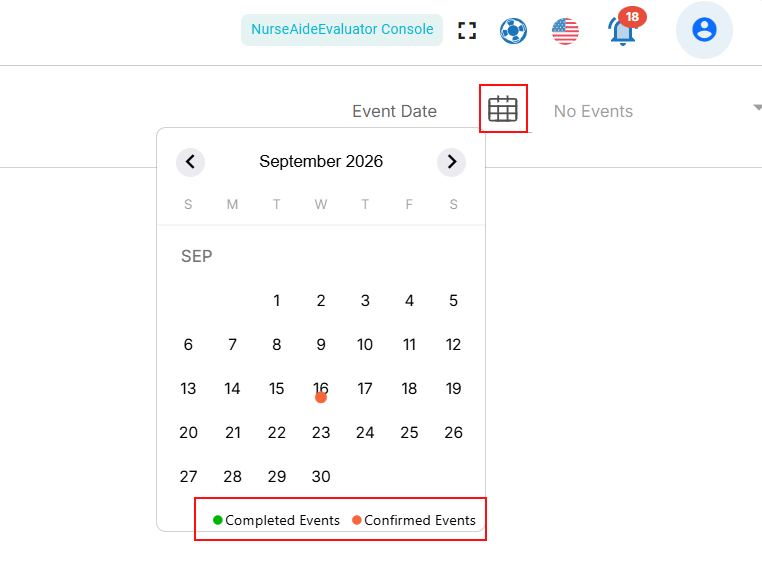
- Click the Calendar icon, then select the event date from the calendar (today).
- In the calendar, confirmed events are marked with an orange color, while completed events in the past are indicated with a green marker.
- In the calendar, confirmed events are marked with an orange color, while completed events in the past are indicated with a green marker.
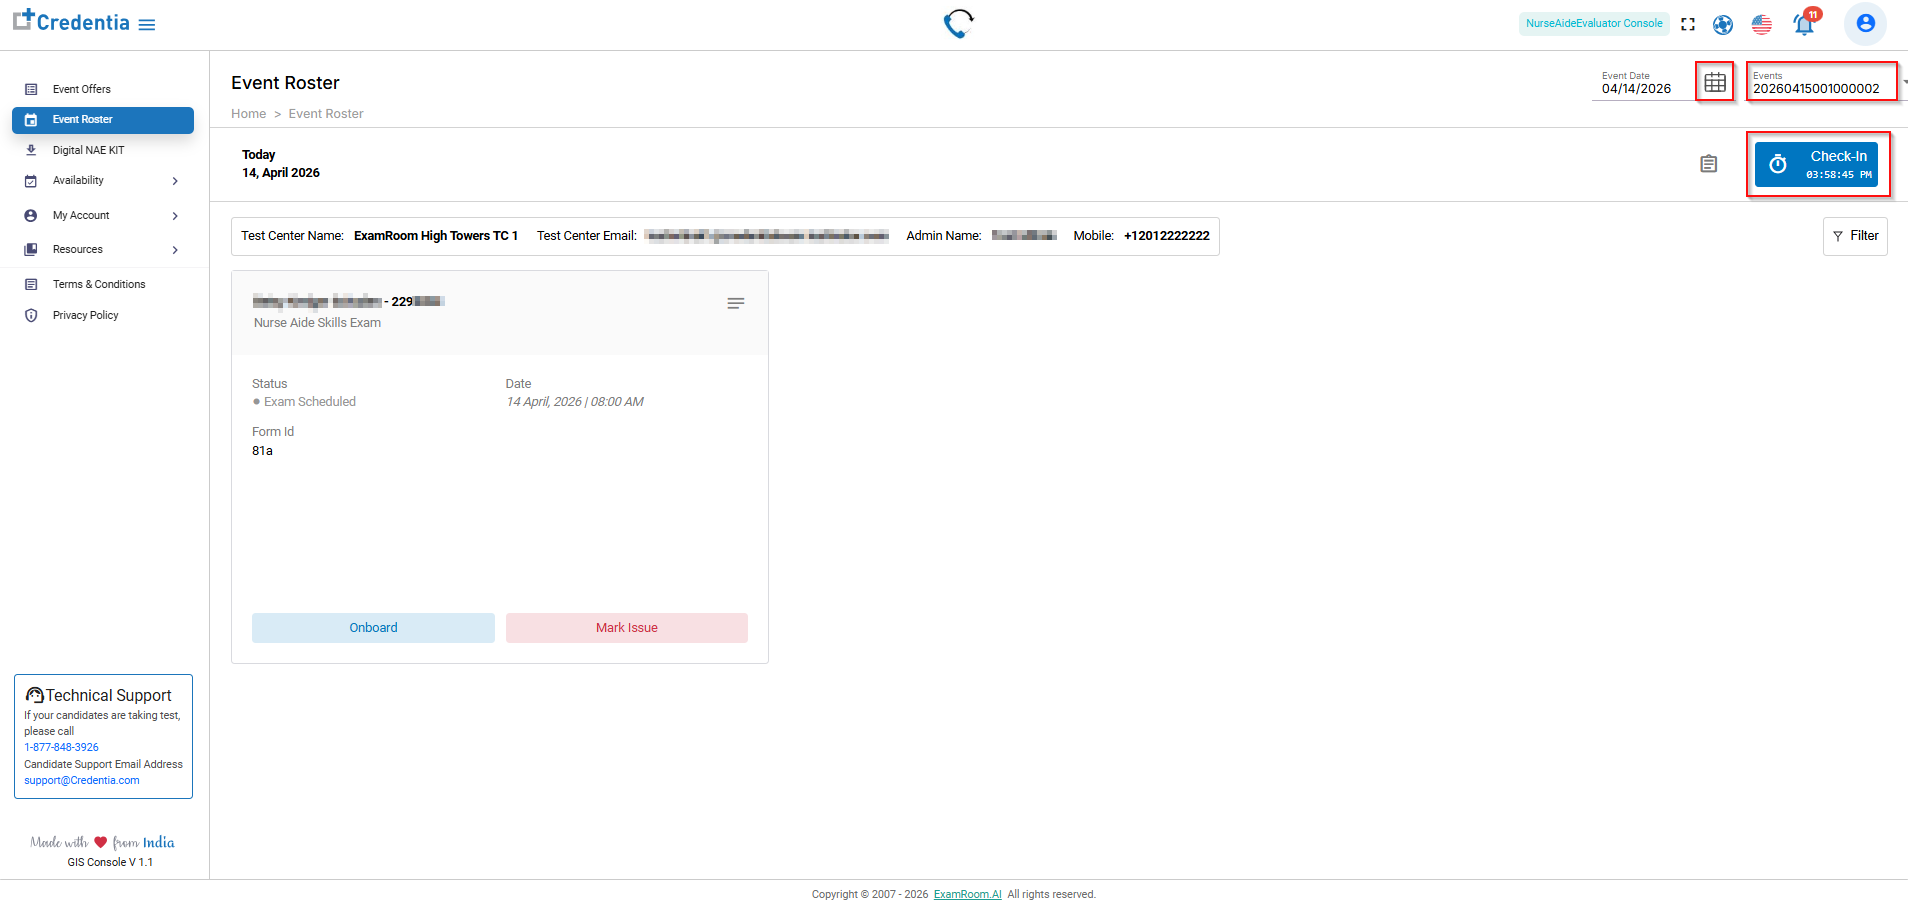
- Select the Event ID from the dropdown list.
- If you have multiple events, all events for the selected date will be listed in the section, and you can choose the specific event from the drop-down menu.
- Once the selected event is displayed. Click the Check In button to start the event.
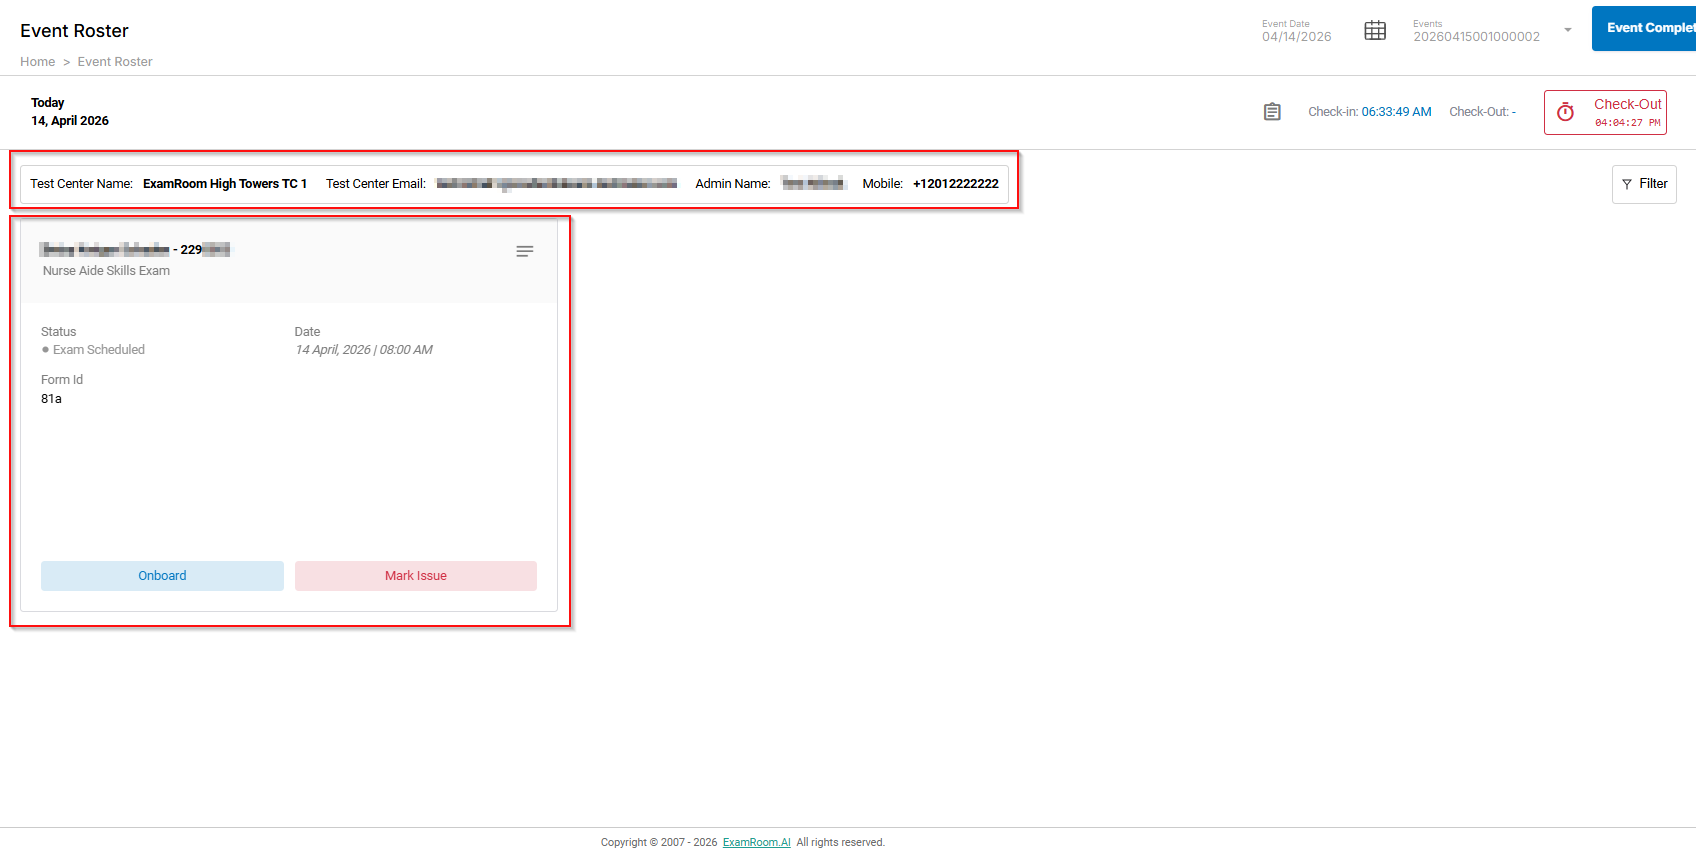
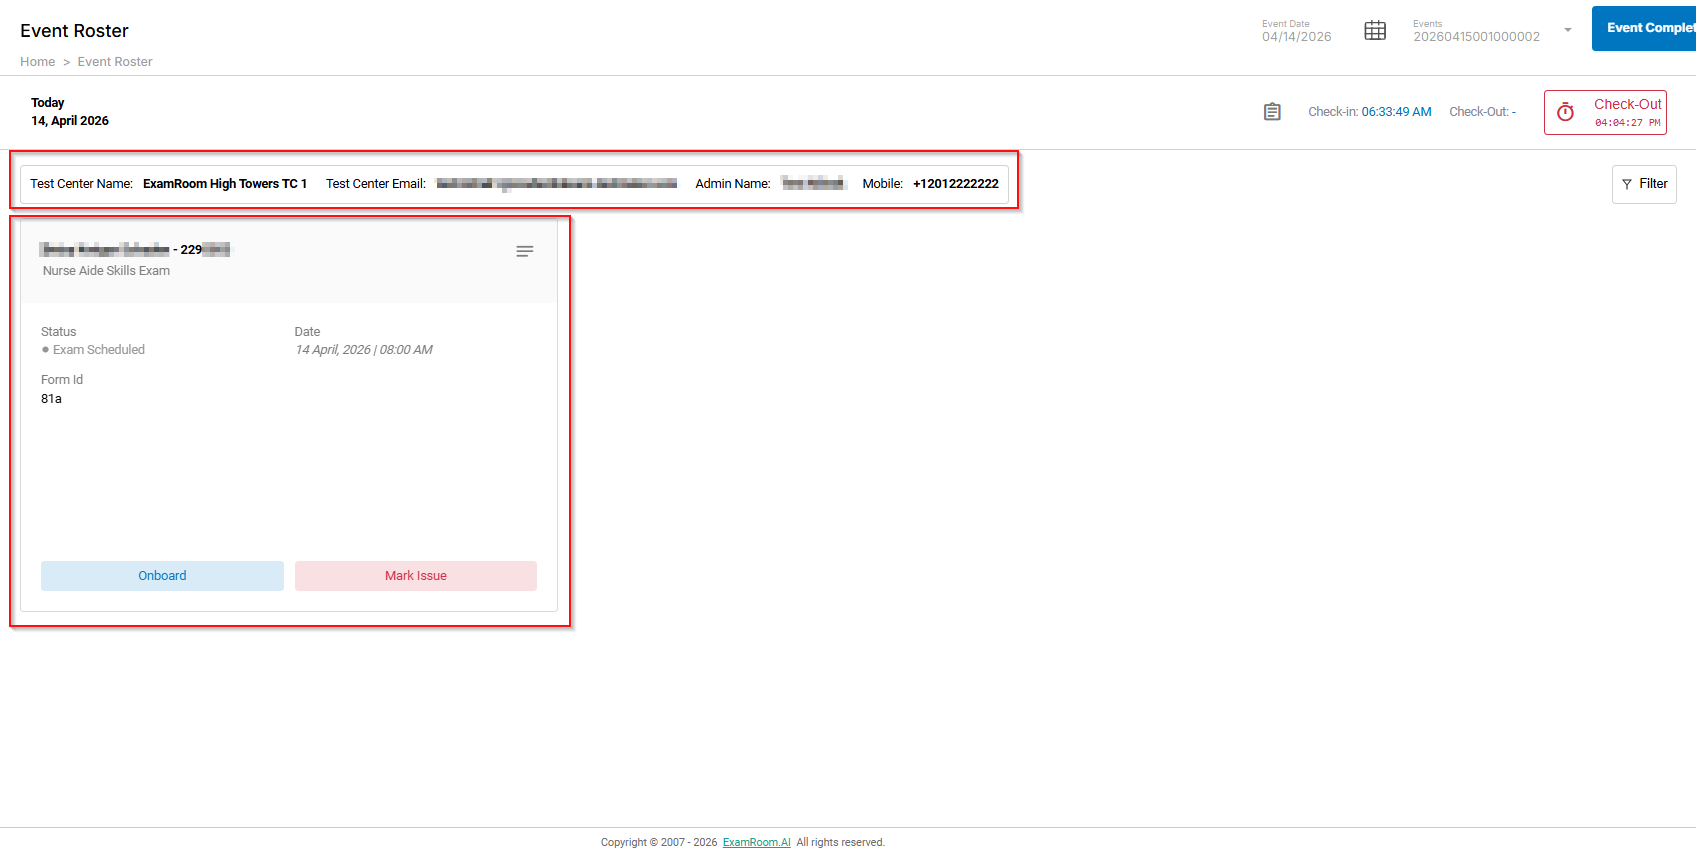
- After making a selection, you can view the Test Center and Candidate details related to the event.
- Test Center Name: The Test Center information includes the name, email, admin name, and phone number.
- Candidate Details Section: All scheduled exam candidates are displayed, with each candidate's info box showing their name, exam type, status, date, time, form ID, and language. Also displays approved accommodation details, if applicable to the candidate.
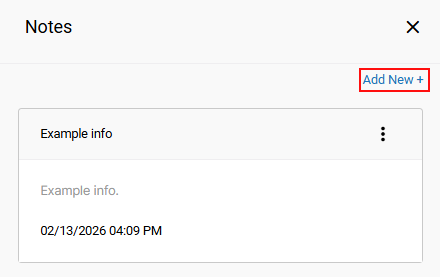
- Add Notes: You can view and add internal reference notes for each candidate.
- Click the Notes icon to open a pop-up where you can see existing or previously added notes.
- Click the Add New+ button to add new notes.
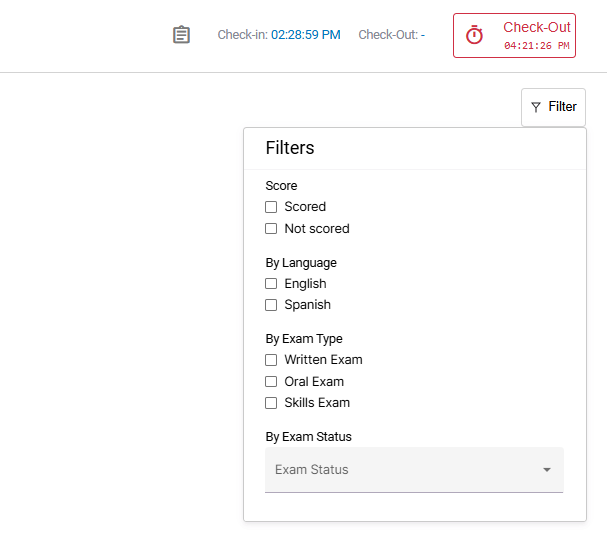
- Filter Search Candidate: If you have many candidates listed in the roster page for the event, you can use the filter option to sort candidates by exam type, exam status, language, and sorted or not scored candidates.
- Click the Filter icon, then select the associated check box to apply the required filter option.
- To remove filters, uncheck all the check boxes.
- Note: Before beginning the exam, ensure to check in and process the candidates on board.
Note: Make sure that you check in before starting onboarding.
Marking an Issue
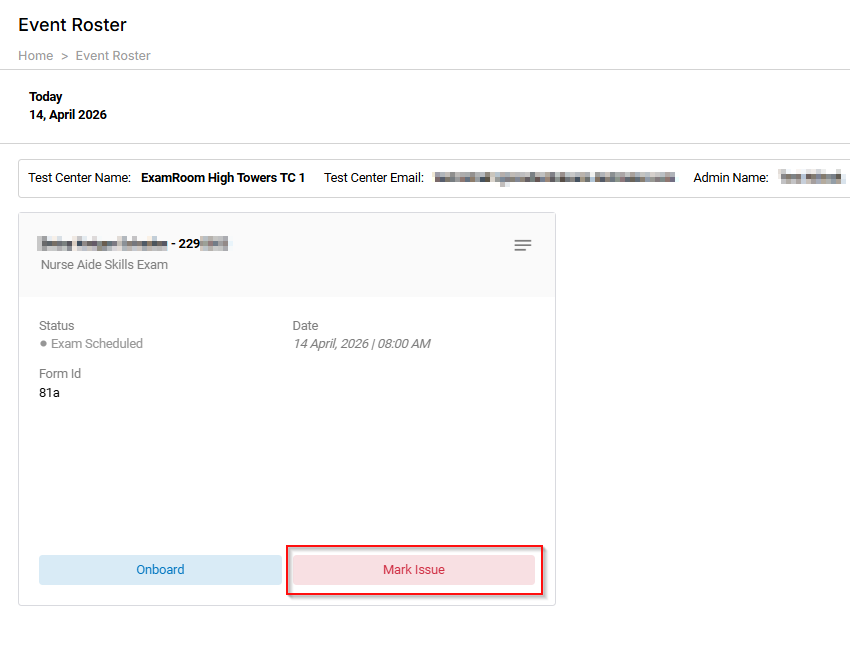
The Mark Issue button in the candidate details section lets you mark a candidate as absent or restrict them from taking an exam.
To mark the issue, follow these steps:
- On the Event Roster page, after you check in the event, select the candidate details section you wish to mark as an issue.
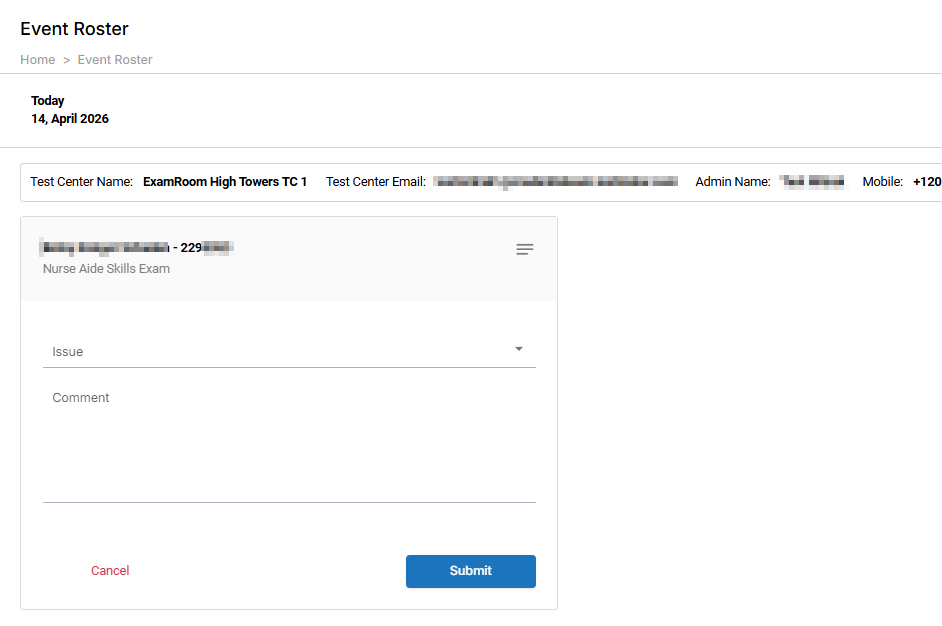
- Click Mark Issue on the candidate details section.
- Select an Issue from the dropdown list mentioned below:
- Absent
- Other facility issue
- Turn Away - Not Candidate's Fault
- Turn Away - Candidate Fault
- Wrong ID
- Relationship
- Language Issue
- Health
- Accommodation
- Before Exam Cheating
- Enter the Description in the Comment field.
- Click Submit to save the issue. To discard, click Cancel.
Reset Mark Issue
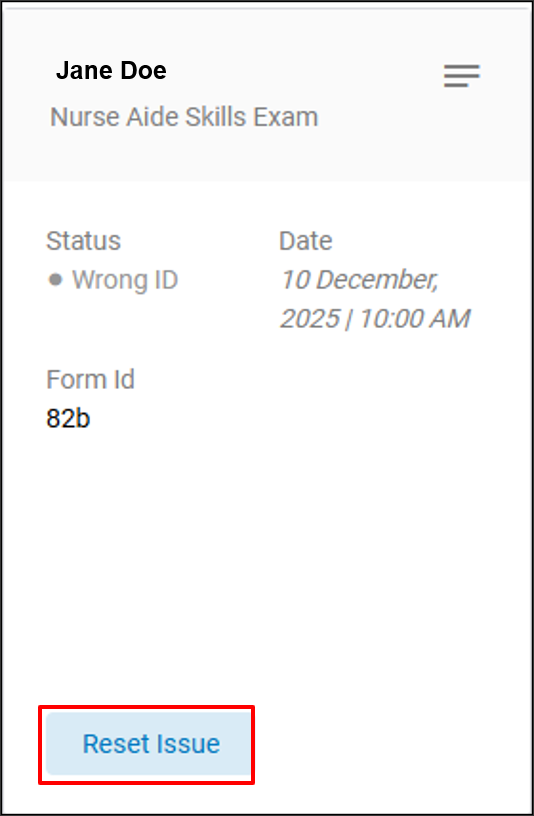
If an issue is marked for the candidate. The status of the issue will be displayed in the candidate details section under status. The Mark Issue and Onboard action buttons will be replaced by a Reset Issue Action Button.
If the marked issue can be resolved before testing starts, clicking the Reset Issue action button will remove the issue, and the Onboard and Mark Issue Action buttons will reappear on the Candidate’s info box.
Onboarding the Candidate
To onboard the candidates, follow these steps:
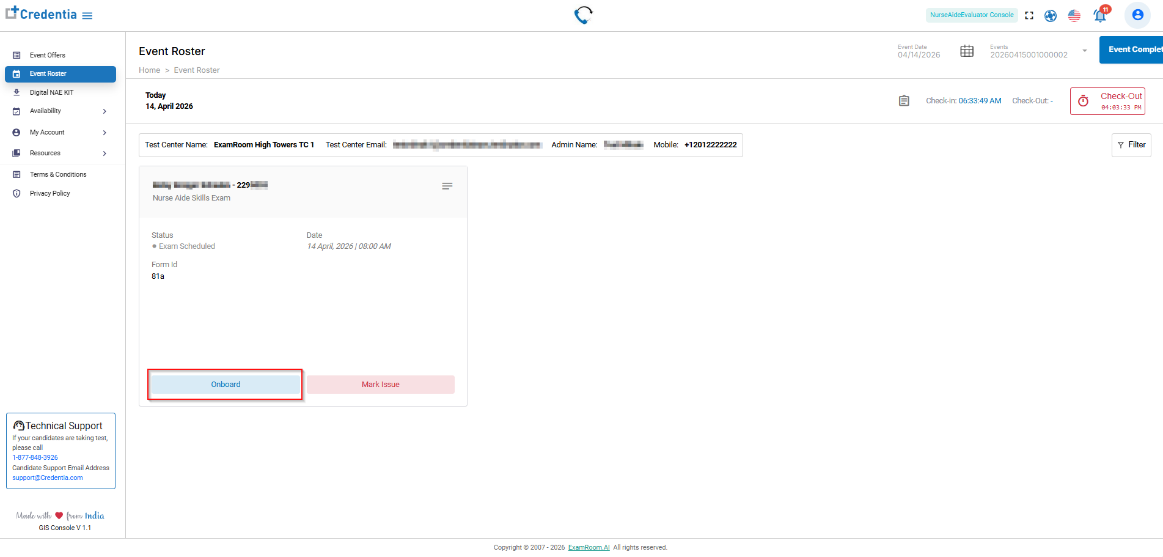
- On the Roster page, after checking in the event, choose the candidate details section you want to onboard. Then, click Onboard to begin the onboarding process.
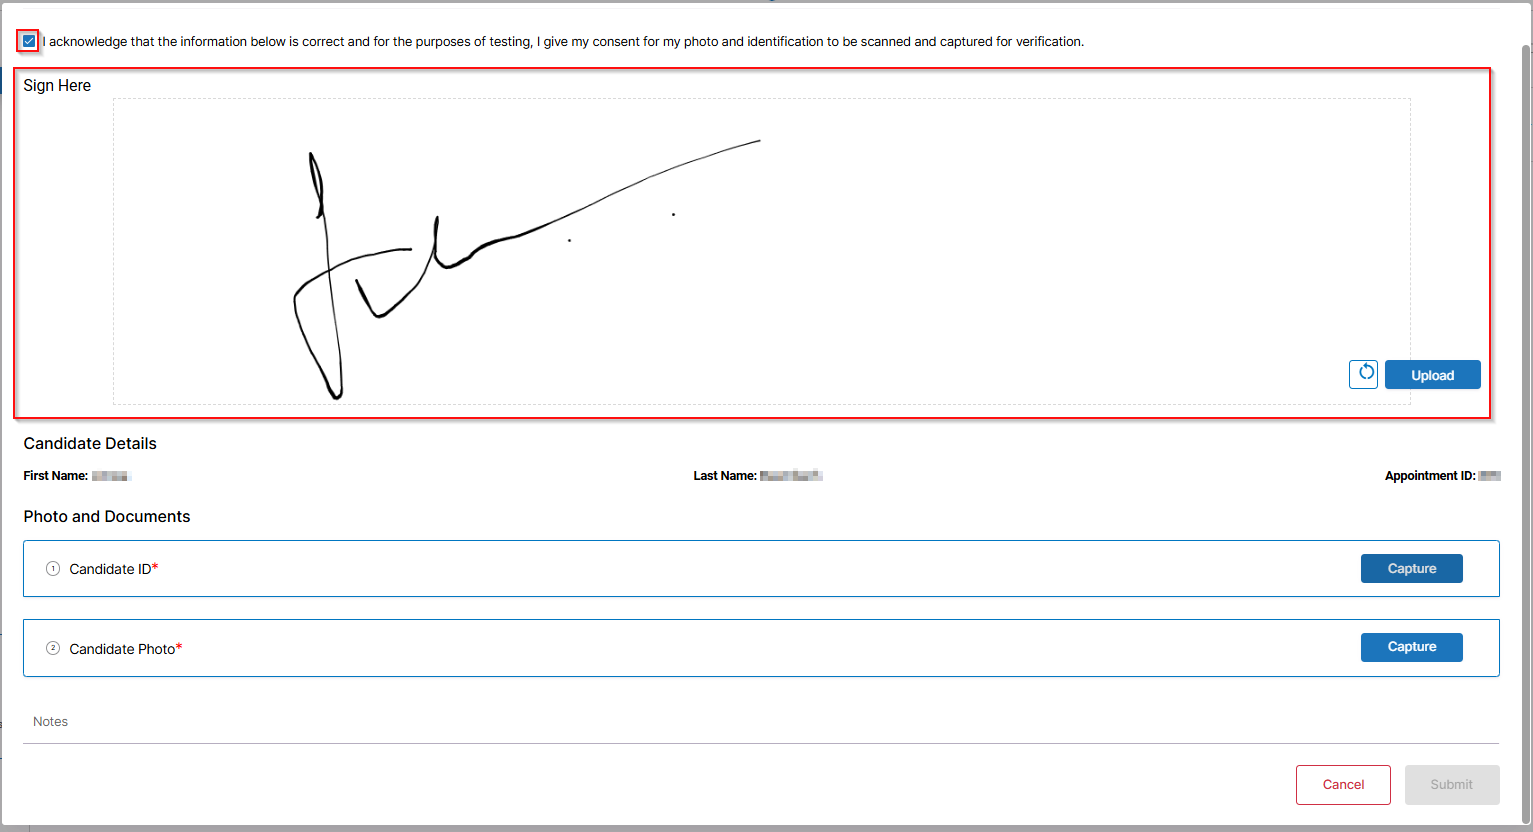
- A pop-up will appear, allowing you to verify and confirm the candidate’s First Name, Last Name, and Appointment ID listed under the candidate details before proceeding.
- After you verify, provide the tablet (device) to the candidate and ask the candidate to acknowledge and sign in the onboarding verification.
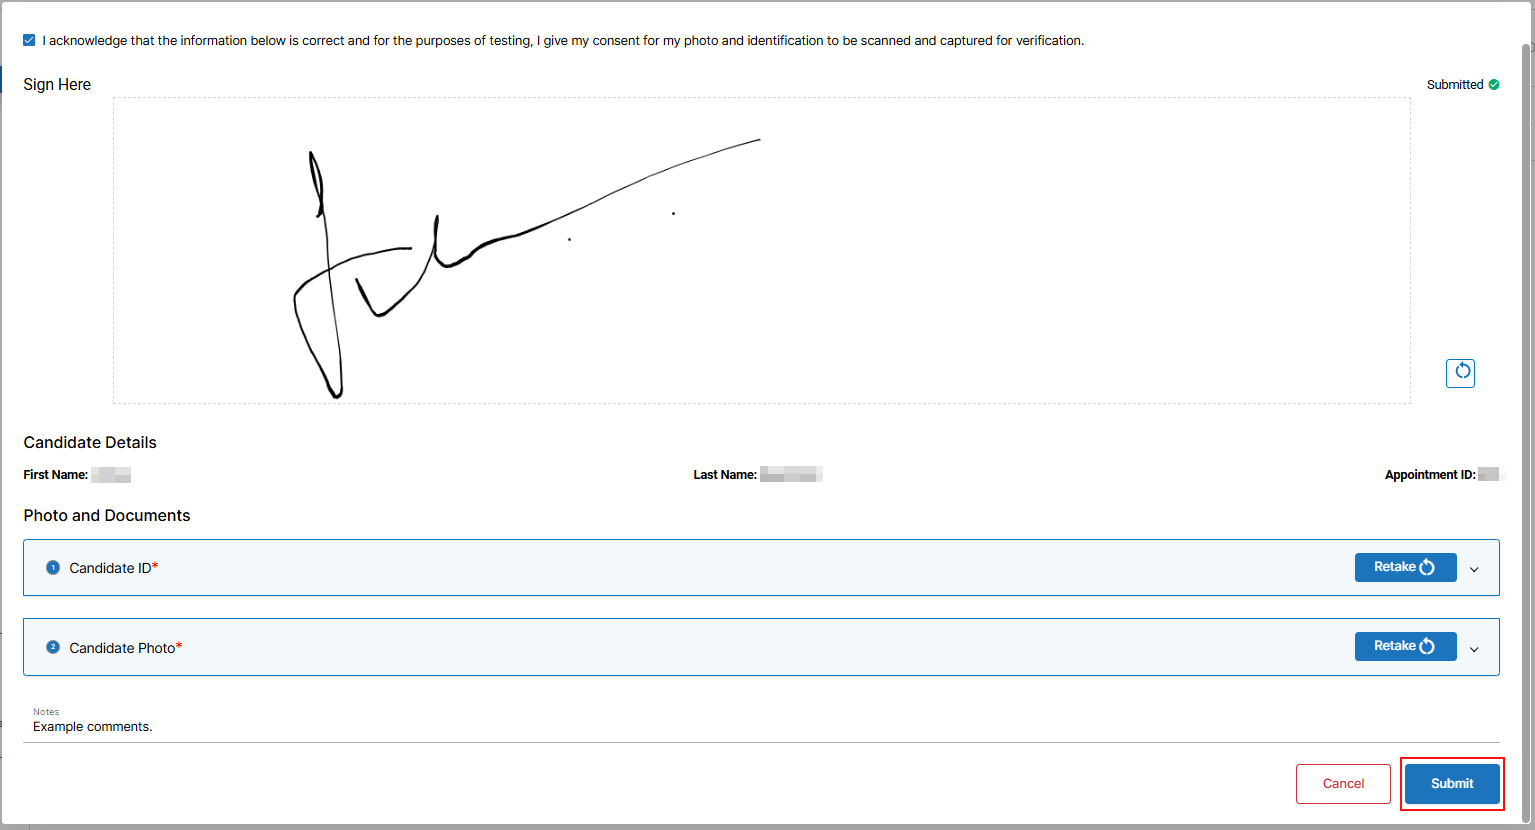
- The candidate needs to check the boxes corresponding to “I acknowledge that the information below is correct and for the purposes of testing, I give my consent for my photo and identification to be scanned and captured for verification.”
- The candidate should sign in the Signature section.
- Click Upload to upload the candidate's signature to proceed. You will see a confirmation message (
) at the top right of the pop-up window.
- You may click the clear
icon to retake the signature.
- You may click the clear
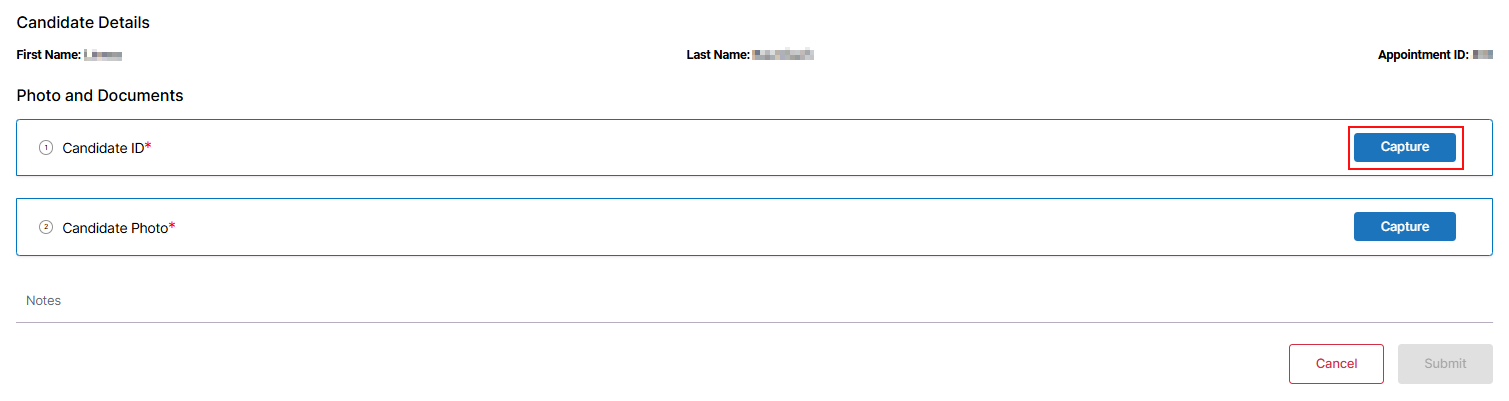
- After getting the candidate's consent, you should capture the candidate ID and candidate photo to complete the onboarding process. Click the Capture button in the Candidate ID field to photograph both the front and back of the ID card.
- Click Allow to enable camera access for taking a picture.
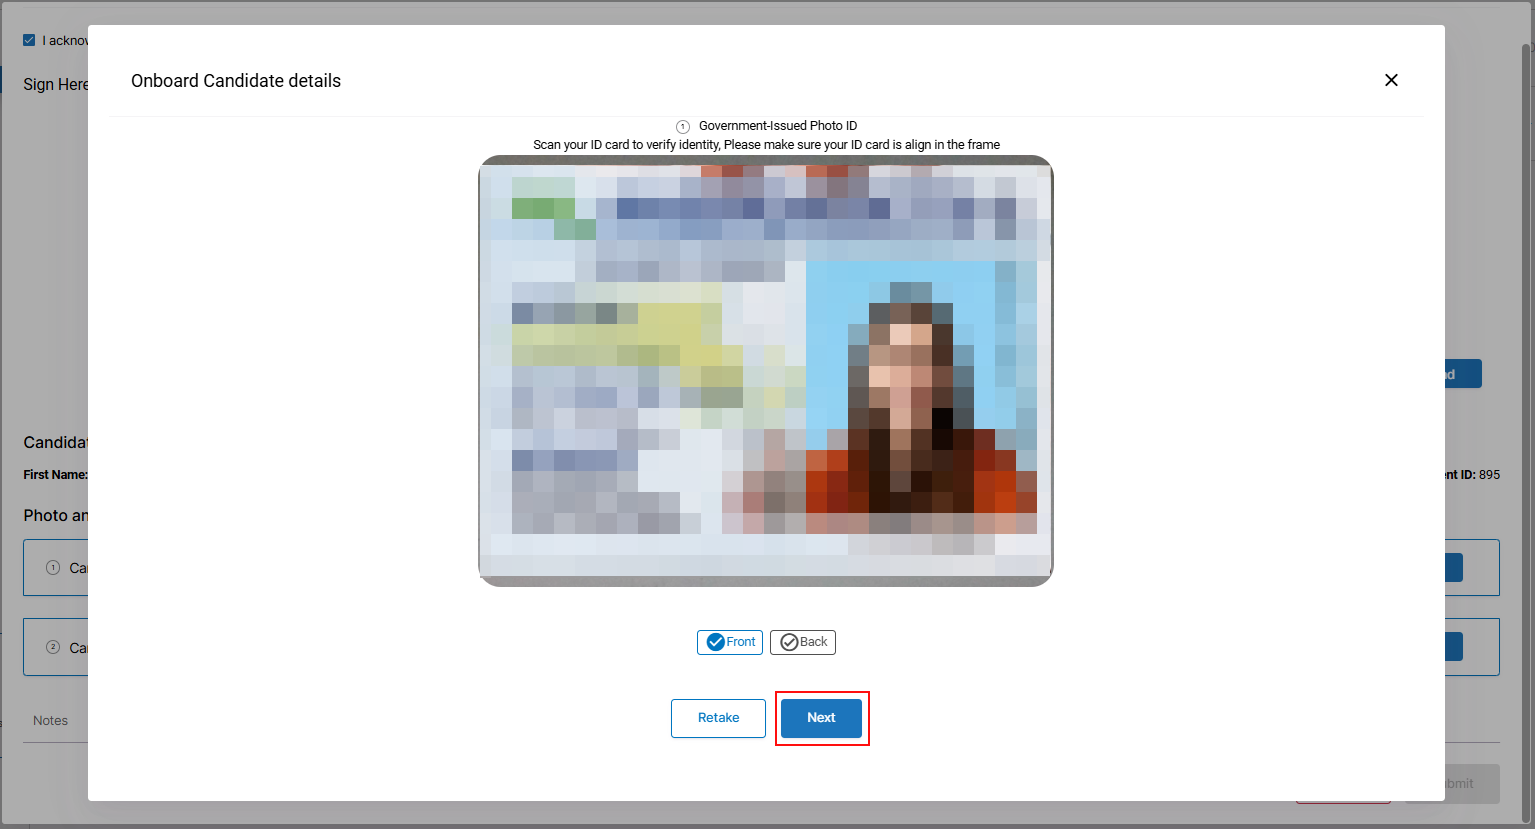
- Show the Front side of the candidate’s ID in front of the camera and click the Camera
icon to capture.
- You can click the Flip
icon to flip between the rear and front cameras.
- You can click the Flip
- Verify the captured front side of the candidate's ID before proceeding. You may use the Retake option. You must ensure that the ID is captured, aligned in the frame, and clear.
- Click Next to proceed.
- Show the Back side of the candidate’s ID in front of the camera and then click the Camera
icon to capture and proceed with the above capture steps to verify the ID.
- Click the Capture button in the Candidate Photo field to take a picture of the candidate.
- Click the Camera icon
- Verify the captured photo of the candidate, and click the Submit button.
- Click the Camera icon
- If you are onboarding a candidate for the written exam, follow the above steps, and for the Assign Booklet options, refer to Onboarding the Candidate for the Written Exam.
- Add Notes, if any, and click Submit to complete the onboarding.
Skill Evaluation
Once you complete the onboarding process, you can start proctoring for the candidates.
To start proctoring, follow these steps:
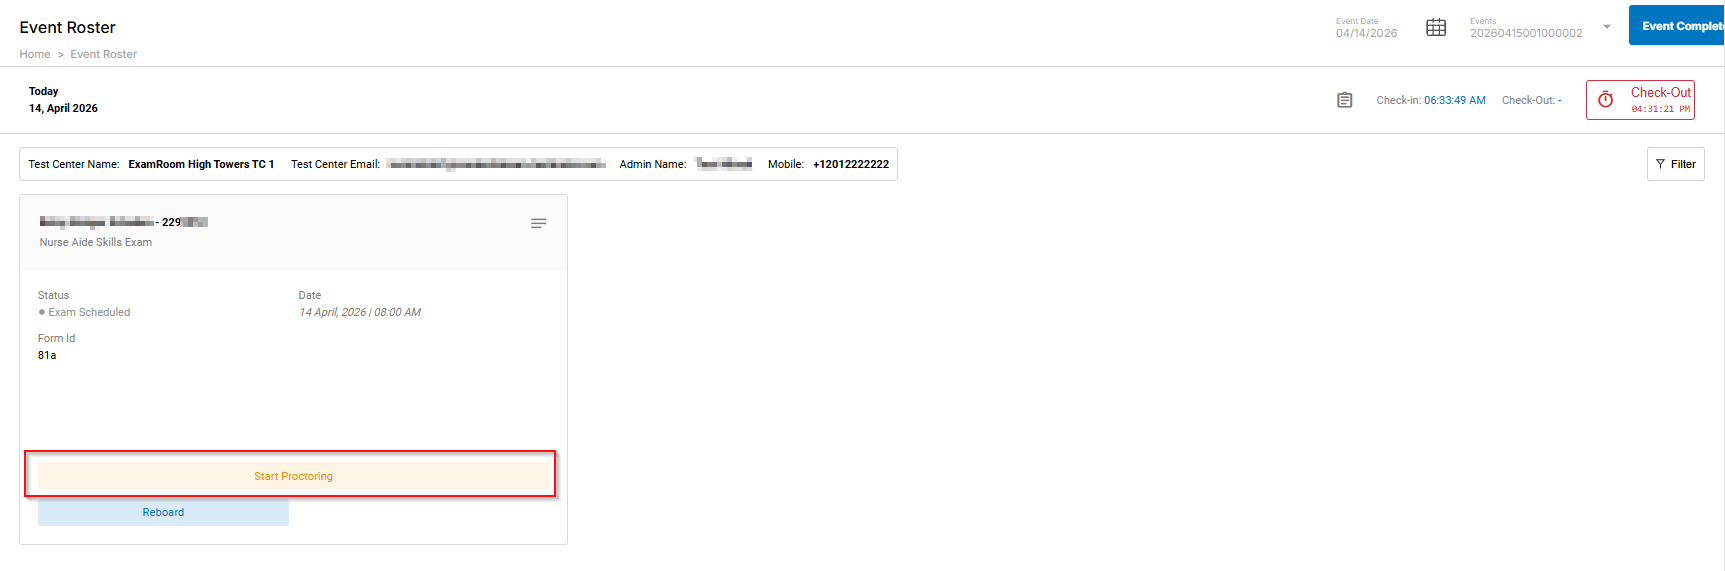
- Click the Start Proctoring option provided in the candidate details section.
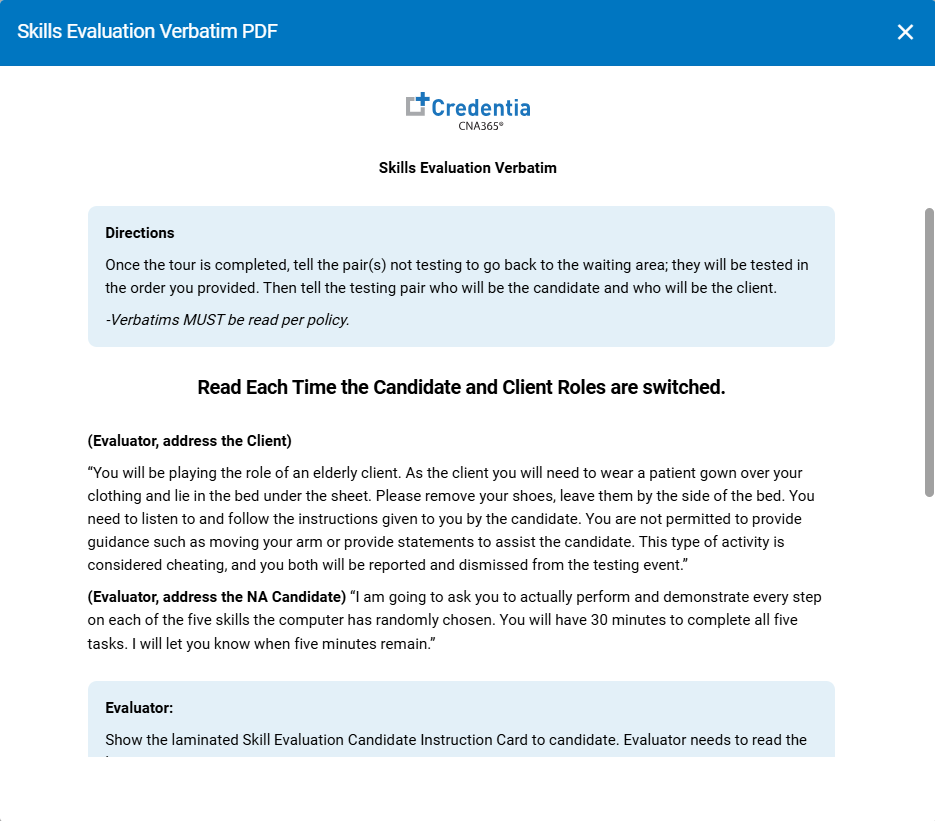
- A Skills Evaluation Verbatim PDF is displayed for you to read and complete the evaluation verbatim. After completing, click the close
icon in the top-right to continue.
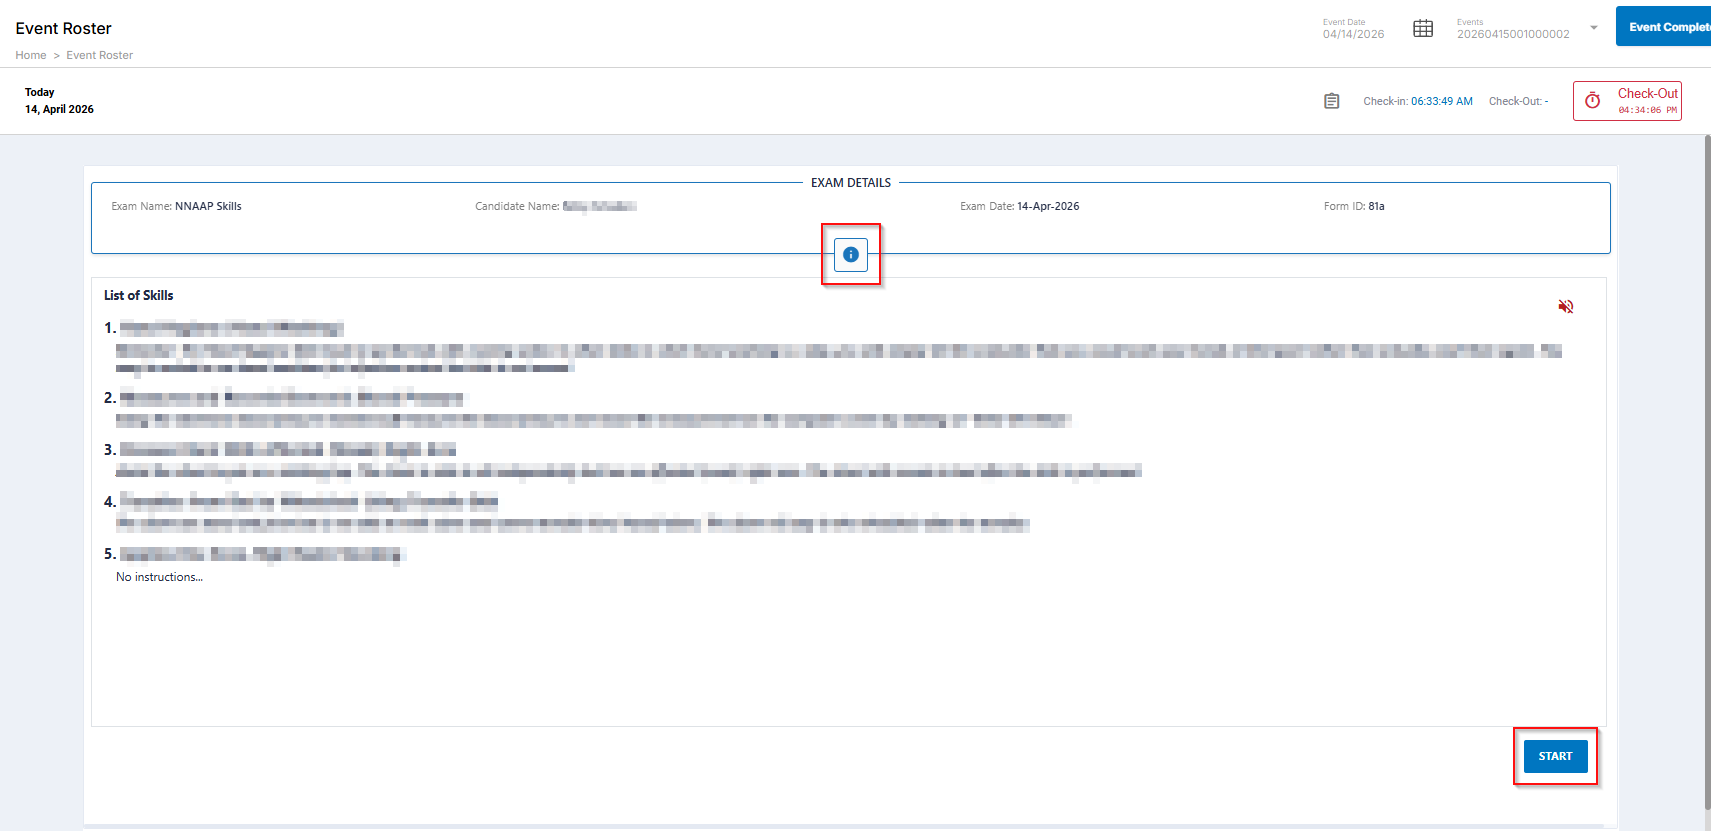
- A new window displays the Exam Details and the list of skills for the candidate. Click the Start button to begin skills evaluation.
- Click the Information
icon to view the Language and the Accommodation requested by the candidate.
- Note: The Accommodation details are available for the candidates who requested accommodation during the registration process.
- Use the Speak
icon at the right side of the page to let the system read out the list of skills.
- Click Start to start proctoring the exam.
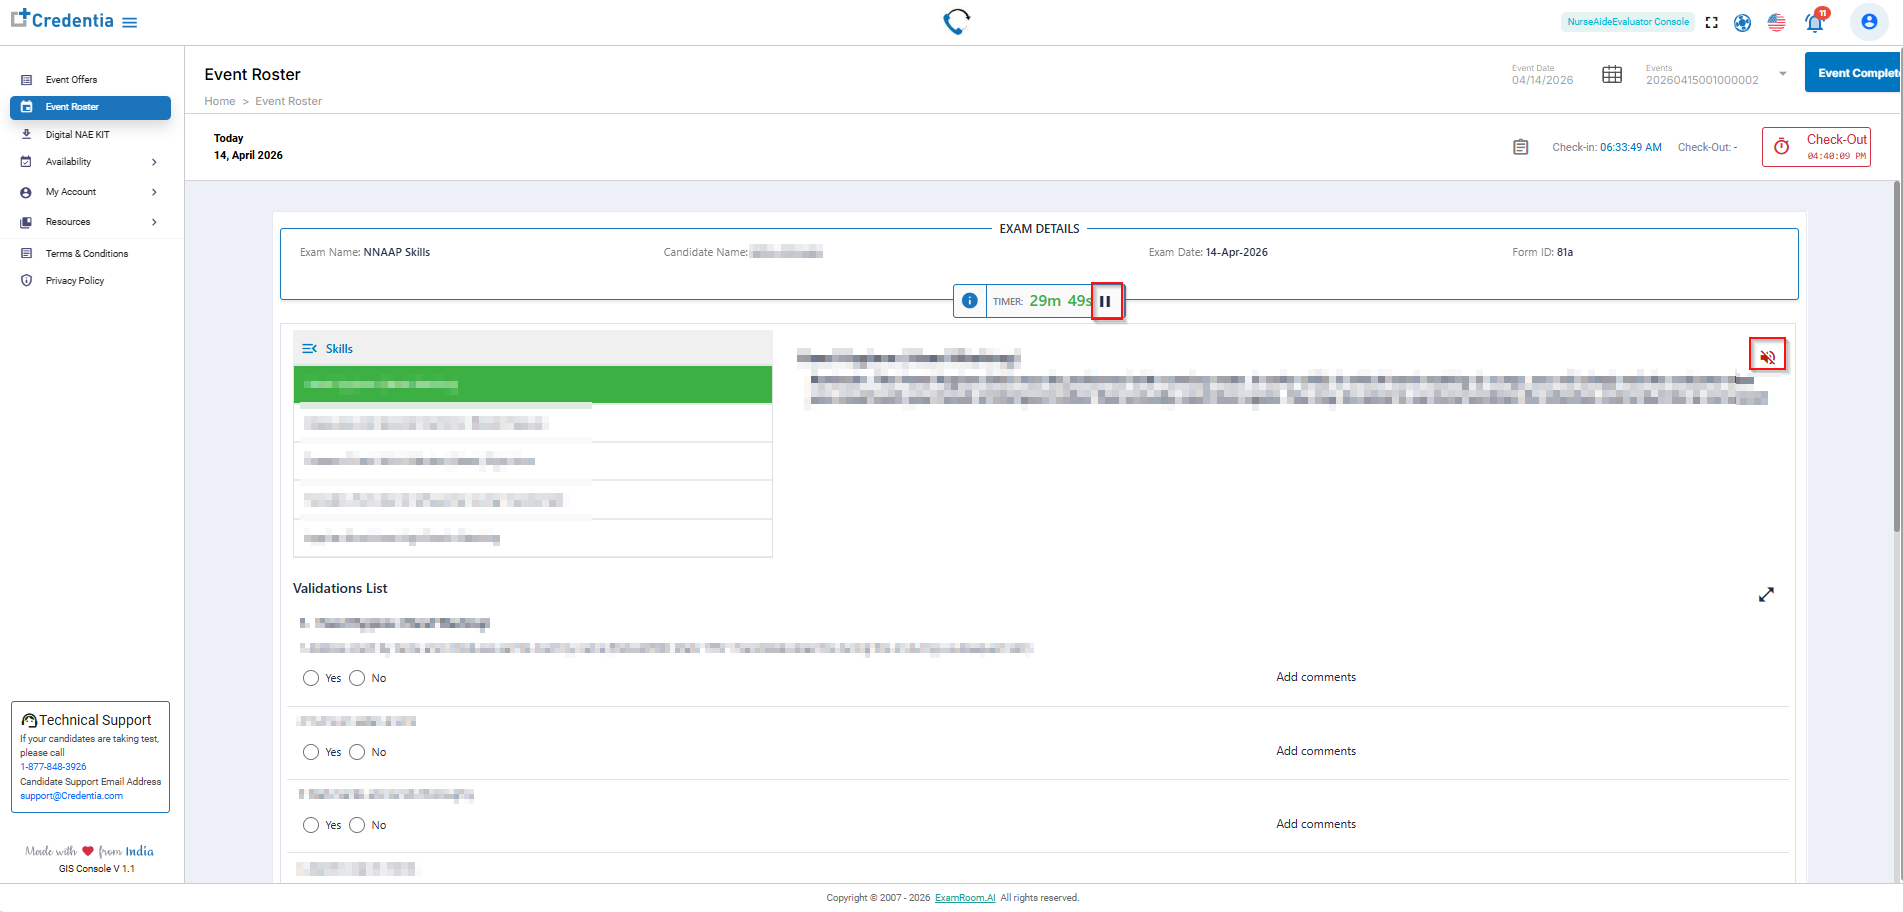
- The Proctoring window displays the list of skills to be performed on the left and the corresponding instructions for each skill on the right. Candidates demonstrate five (5) skills, and they have 30 minutes to complete the task. The following provides the instructions and options available on the Validation Page:
- Above the validation list, you'll find the skills and reminder instructions the candidate must follow. You can also refer to this for your guidance.
- Use the speaker
icon to read out the list of skills again for the candidate.
- Use the speaker
- Instruct the candidates about the exam duration before starting the exam.
- You can pause and resume the exam by clicking the Pause and Resume button at the top of the window.
- Critical steps are star-marked and highlighted in bold.
- Above the validation list, you'll find the skills and reminder instructions the candidate must follow. You can also refer to this for your guidance.
- Once candidates start the test, you should validate each step by updating the Validation List.
- To update the Validation List, select Yes or No for each corresponding step:
- Select Yes if the candidate performs the step correctly.
- Select No if the candidate does not perform the steps or performs them incorrectly.
- If you select No, click Choose an Incident, and select the options from the dropdown.
- Did not perform the step.
- Step performed incorrectly.
- In the Add Incident Details field, enter your comments about the incident.
- Click Save to save the details.
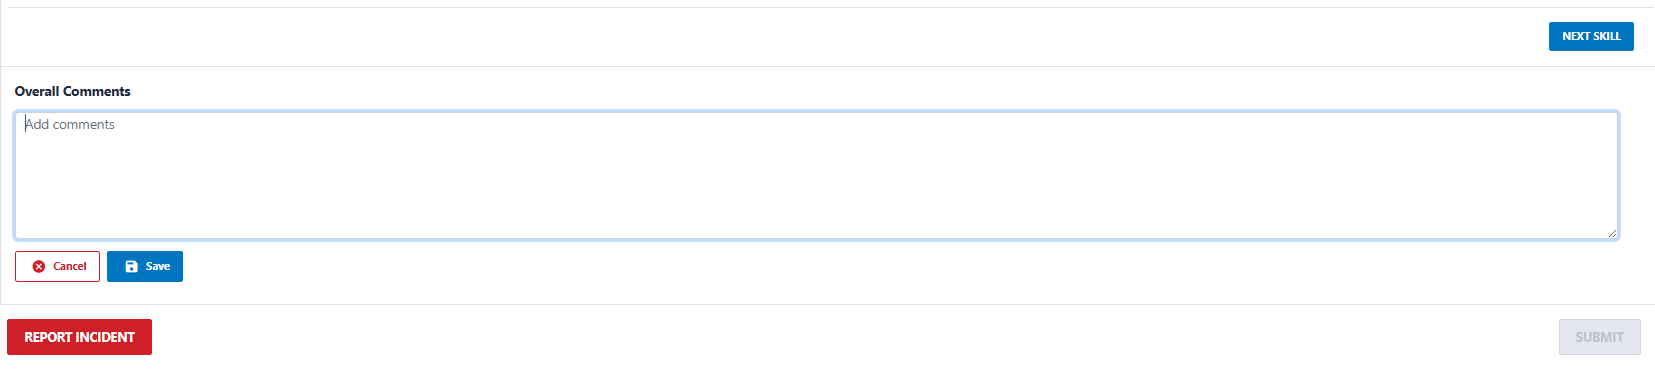
- Enter Overall Comments for the validated skill, if required, and click Save to save the comments.
- After validating the first skill, click Next Skill to proceed to the next page and continue with the remaining skills. You can validate all skills as described in the instructions above.
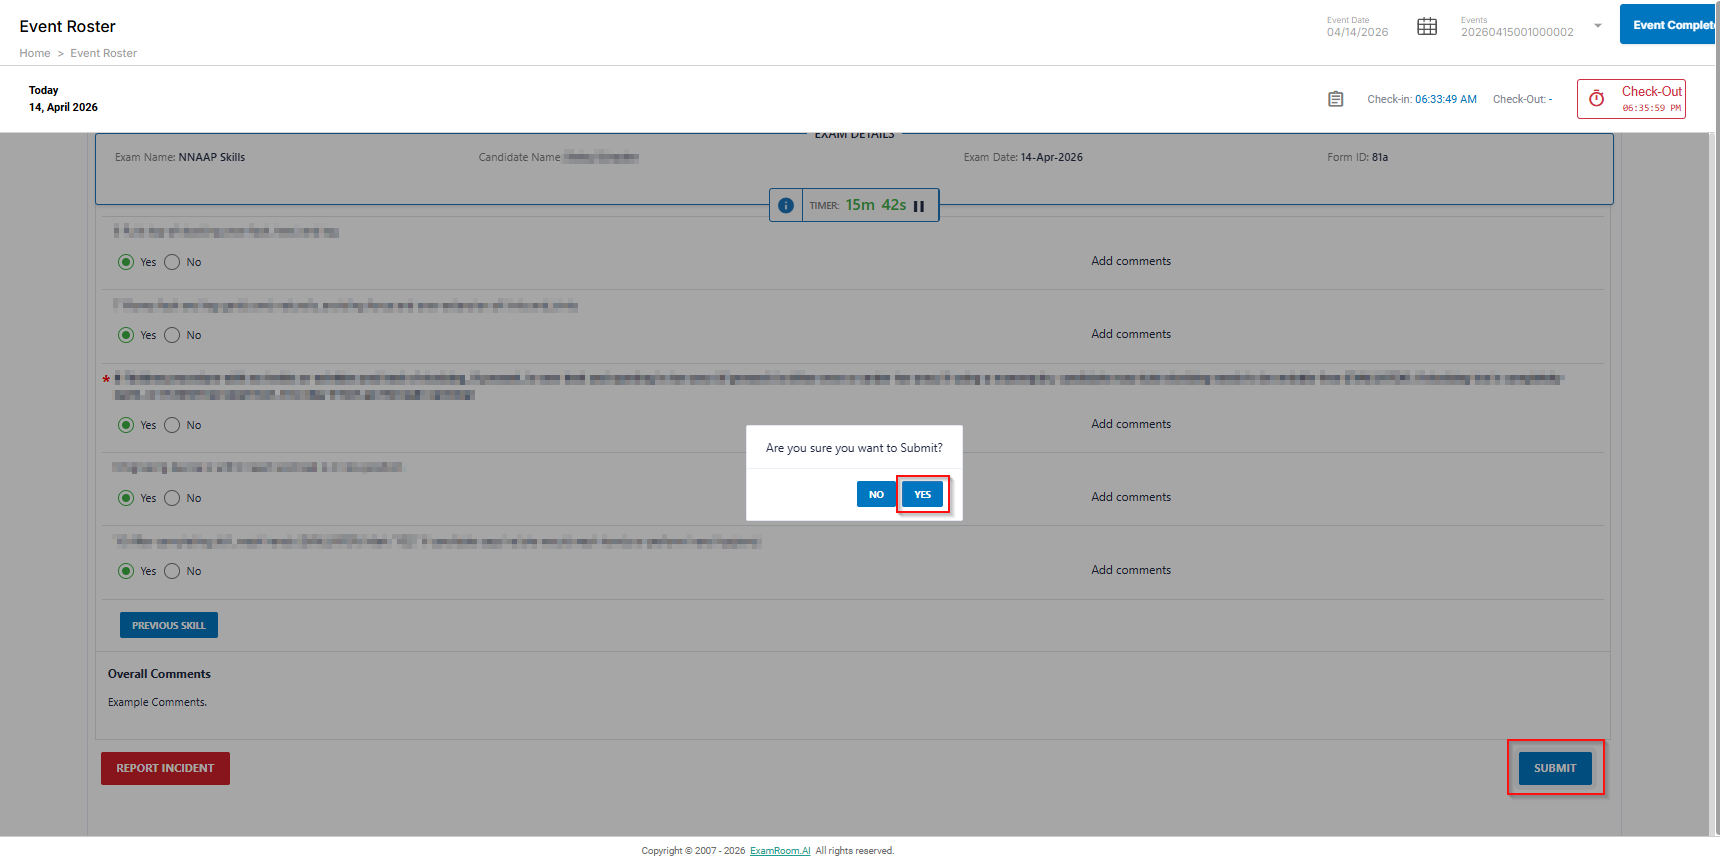
- Once the candidate completes all five (5) skills, click Submit and select Yes to confirm the submission.
- After submitting the test, you will be redirected to the main Roster Page.
- In the Roster page, select the next candidate from the roster.
- Click Start Proctoring and follow the same steps for the next candidate.
- Once you complete the event for all the candidates, click Event Complete to close the event.

Note:
- Verify you have completed validation for all the scheduled candidates and updated the Mark Issue for candidates who have not attended the event, to complete the event.
- Verify in the candidate details section to confirms that the candidate has scored successfully in the skill exam.
Enter Measurement Value
Some skills may require the candidate to measure and record the values, such as the client’s weight. The Enter Measurement Value option allows recording of those values.
Note: Check the question's instructions to see whether you need to perform any task on your part.

To record the measurement value in the system, follow these steps:
- Click the Enter Measurement Value button.
- Provide the tablet to the candidates and instruct them to capture the measurement values by following the steps below:
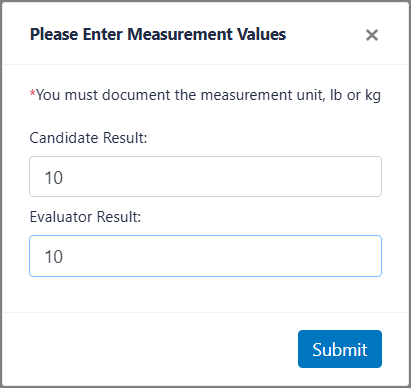
- Enter the values in the Candidate Result field and click Submit.
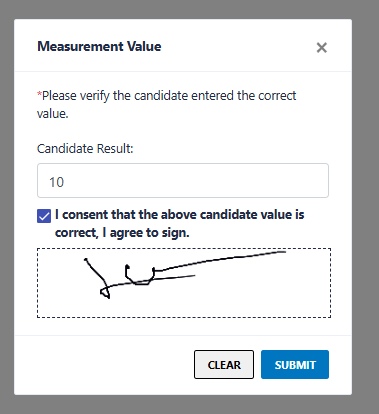
- After submitting the values, select the check box and enter the signature in the Signature Here field.
- Click Submit to save the values.
Note: Use the Clear option to clear the Signature Here field.
- Once candidate values are submitted, get the tablet from the candidate and record your values in the Evaluator Result field.
- Click Submit.
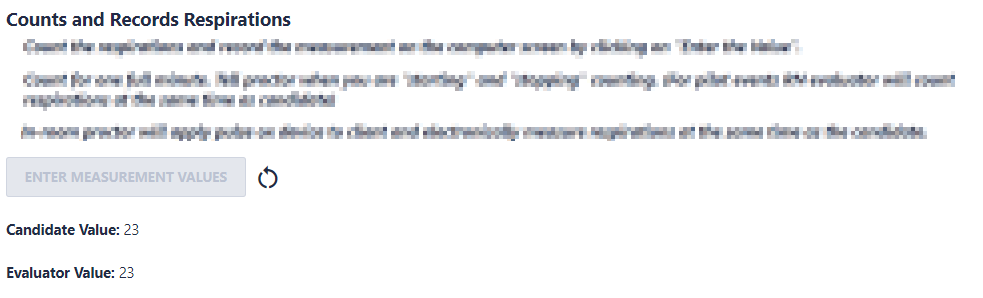
- Once you Submit the values, the captured value will be displayed in the Candidate Value and the Evaluator Value, respectively.
Note- Use the Refresh
icon to recapture the measurement values. Follow the above steps to recapture the measurement values.
- Recapturing the values is allowed only when the candidate performs that specific skill. If the candidate moves to Next Skill, the Refresh button
- Use the Refresh
Report Incident
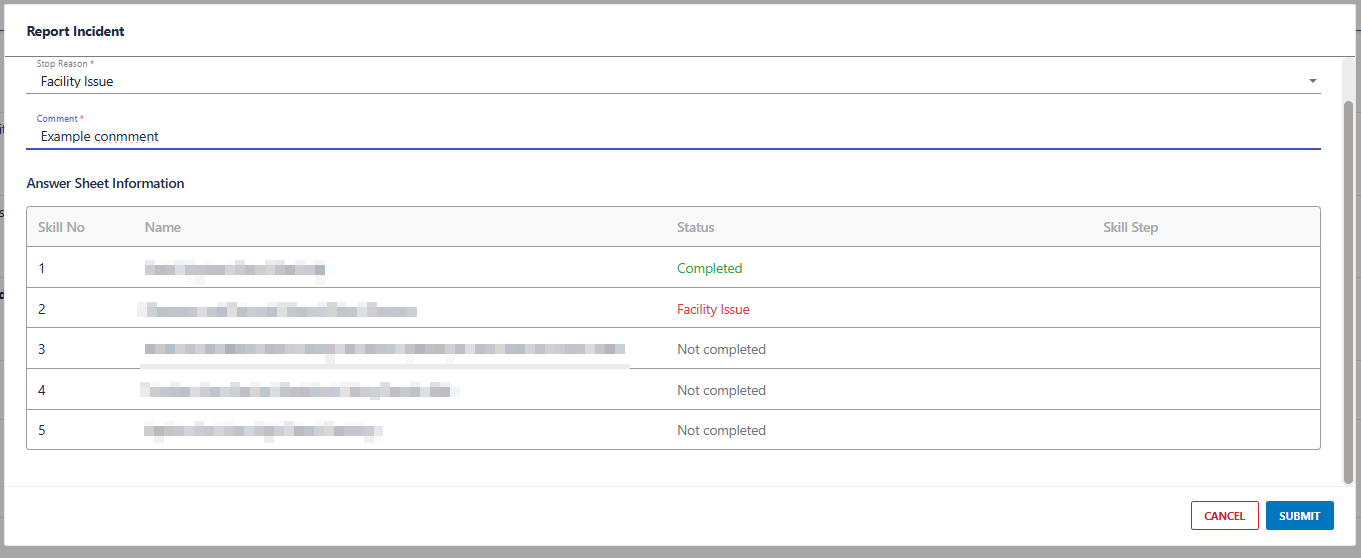
During proctoring, if you need to stop the test due to safety issues, the candidate is ill, walks away, cheats, or there is a facility issue. You have the Report Incident option to stop the test.
To apply the Report Incident, follow these steps:
- Click Report Incident. A pop-up window appears to report the required incident.
- Select a reason from the Stop Reason dropdown menu. Your options include Candidate ILL/WALK AWAY, Cheating, and Facility Issue.
- In the report incident section, the failed step is captured based on where you initiated this option.
- Enter your comments for the incident in the Comments field.
- Click the Submit button to submit the Report Incident.
Skill Day Orientation
The Skill Day Orientation is conducted to provide an overview of Credentia, its process, and basic knowledge of the skill test. Generally, Credentia Operations schedules the skills day orientation event and shares it with new hires (CNAs newly joined to evaluate candidates' skills) and Auditors.
If you attend the skill day orientation event as an auditor, refer to the steps below:
- Navigate to the Event Roster Page, select the Event Date, and click the displayed Event ID from the dropdown. The Roster is displayed as shown below.
- This page displays the Test Center Name, Admin Name, Event Date, Event ID, and Check-In button. Click Check-In to check in to the event and view its details.
- Click Check-In to officially start the event.
- The Check-in button allows the NAE to click the action button in the Candidate details section and other actions during the event. Not clicking the button will provide a pop-up notification that Checking In is required.
- The Check-in button allows the NAE to click the action button in the Candidate details section and other actions during the event. Not clicking the button will provide a pop-up notification that Checking In is required.
- Click Attendance on the Roster page. The Attendance page is displayed. The Attendance button includes the new hire details and an option to mark their attendance.
- The following are the descriptions of the Attendance Page:
- Global Search: Enter the keyword in the global search box to search for hires (New Hires).
- First Name: Shows the first name of the new hire.
- Last Name: Shows the last names of the new hire.
- Phone Number: Shows the contact details of the new hires' phone numbers.
- Offer Status: Shows the new hire's event offer status.
- Present: Shows the new hire's event offer status.
- Absent: Click to mark the new hire as absent.
- Event Complete: After completing the event, you can mark the event complete on behalf of the new hire, if required.



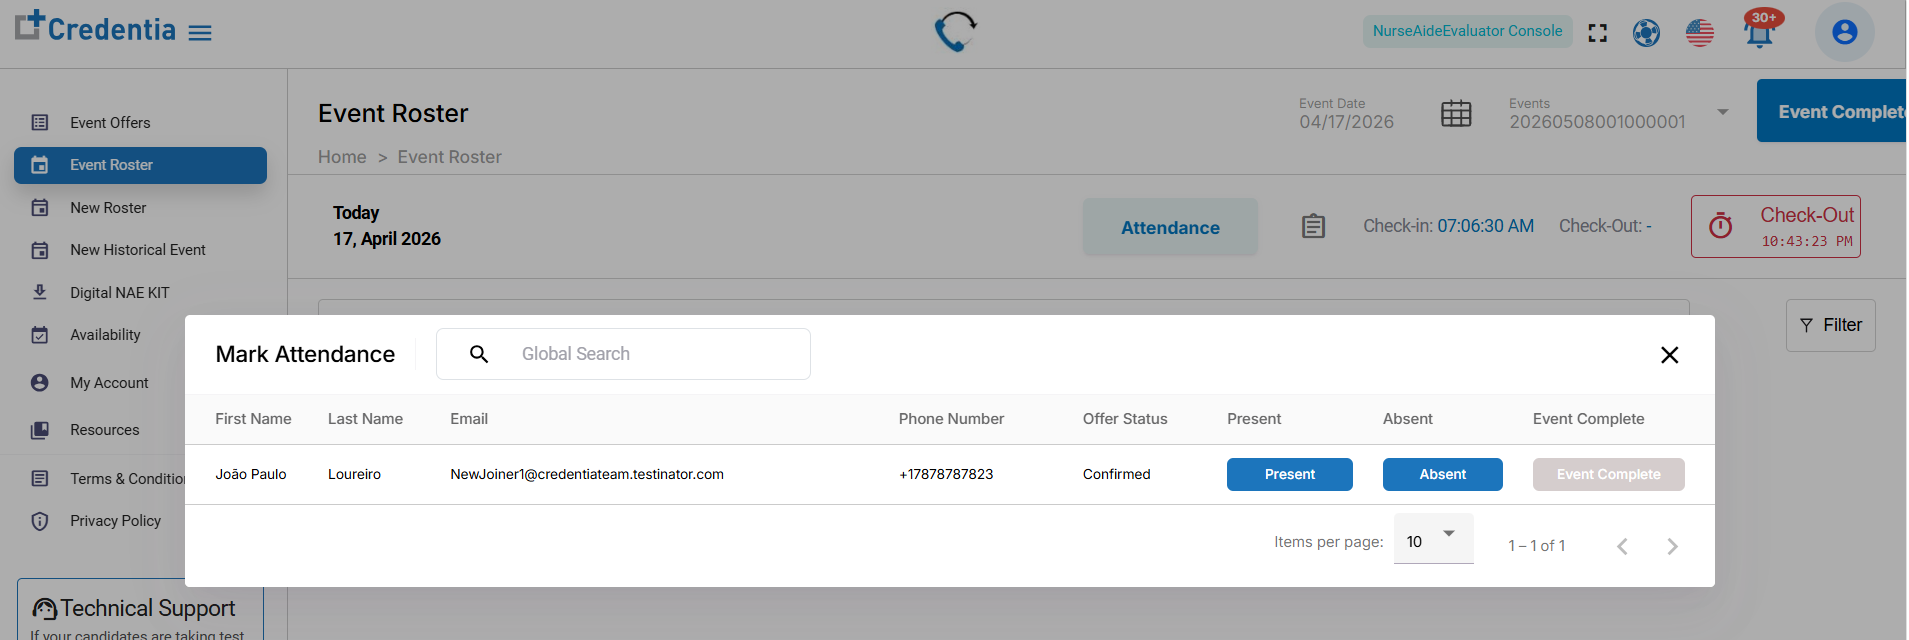
- Once orientation is complete, click Event Complete to complete the event.
- Click Confirm displayed in the dialog box “Do you want Complete this Event?”
- After completing the event, navigate to the Event Results and Invoices in the My Account section and submit the invoices. Refer to Event Results and Invoices for more details.
Auditing or Cofacilitation
If the event is scheduled with auditing or co-facilitation for the new joiners, then the Roster window will appear with the attendance button, audit form, and candidate details.
Click Check-In to check into the event.
Attendance for the New Hire
The Attendance button includes the new hire's details and an option to mark their attendance.
To mark attendance, follow these steps:
- Click Attendance on the Roster page. The Attendance page is displayed.

The following are the descriptions of fields found on the Attendance Page:
- Global Search: Enter the keyword in the global search box to search for hires (New Hires).
- First Name: Shows the first name of the new hire.
- Last Name: Shows the last names of the new hire.
- Phone Number: Shows the contact details of the new hires' phone numbers.
- Offer Status: Shows the new hire's event offer status.
- Present: Click to mark the new hire as present.
- Absent: Click to mark the new hire as absent.
- Event Complete: After completing the event, you can mark the event complete on behalf of the new hire, if required.
Audit Form
The purpose of the Audit Form is to review the NAE’s performance in validating the candidate's performance.
To complete the audit form, follow these steps:
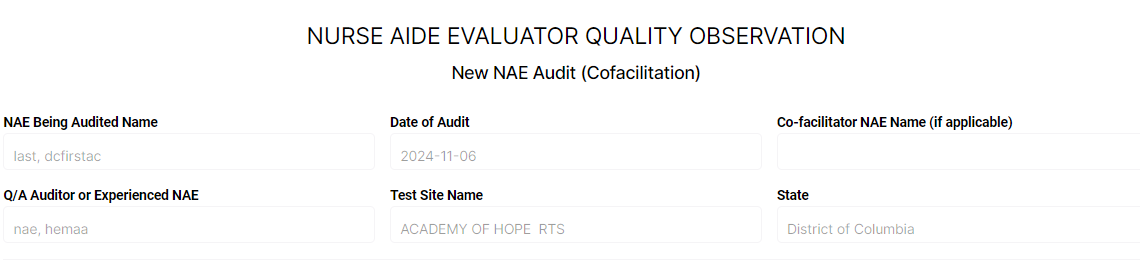
- Click Audit Form on the Roster page. The Audit Form window is displayed.
- The first section of the Audit Form consists of non-editable fields below:
- NAE Being Audited Name: Displays the name of the new joiner who is being audited.
- Date of Audit: Displays the date of the event.
- Cofacilitator NAE Name: Displays the cofacilitator name who is assigned to cofacilitate the event (NAEs who can cofacilitate are eligible to act as cofacilitators).
- Q/A Auditor or Experienced NAE: Displays the NAE’s name who is auditing.
- Test Site Name: Displays the name of the test site.
- State: Displays the state where the event is conducted.
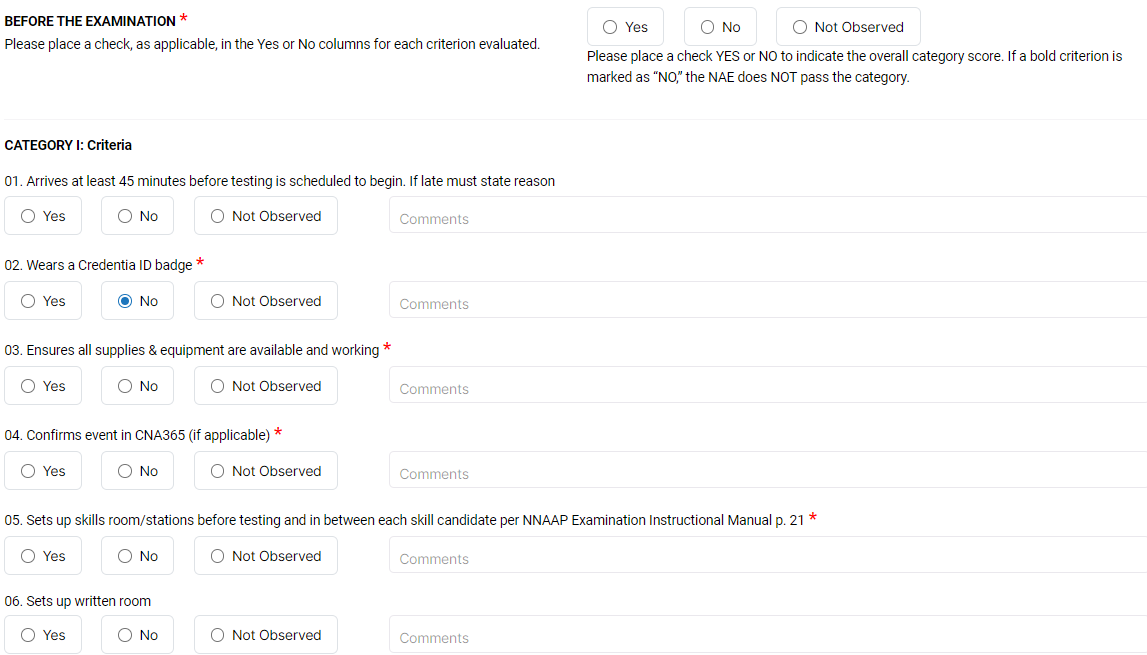
- In the “Before the Examination” section, review the steps that need to be followed by the NAE before the exam begins. Select the corresponding checkboxes (Yes or No) to validate the steps.
- In the During The Examination section, you should review the steps that need to be followed by the NAE during the exam. Select the corresponding checkboxes (Yes or No) to validate the steps.
- In the Skill Examination section, review the steps that need to be followed by the NAE during the skill exam. Select the corresponding checkboxes (Yes or No) to validate the steps.
- Select the checkboxes to update the number of Variances.
- Select the checkboxes corresponding to “Were any variances critical elements (bolded steps)?”
- Select the candidate count who was dual scored in the section “How many candidates were dual scored?”
Note: Auditor/Experienced NAE should dual score a minimum of 6 candidates (Colorado only: min. of 7). For all states, if fewer candidates are dual scored, the auditor must state the reason on this form. For example: “Only 5 candidates tested skills.”
- Rate the new NAE on a scale of 1 to 4.
Note: If there were 9 or more variances and/or variances with critical steps, the NAE rating automatically = 3 - NEEDS Improvement.
- Enter the description in the field “Plan of Action (completed by Credentia and the RN Nurse Aide Evaluator Quality Assurance Manager)”.
- After completing all the fields, click Submit Form to submit the Audit form.
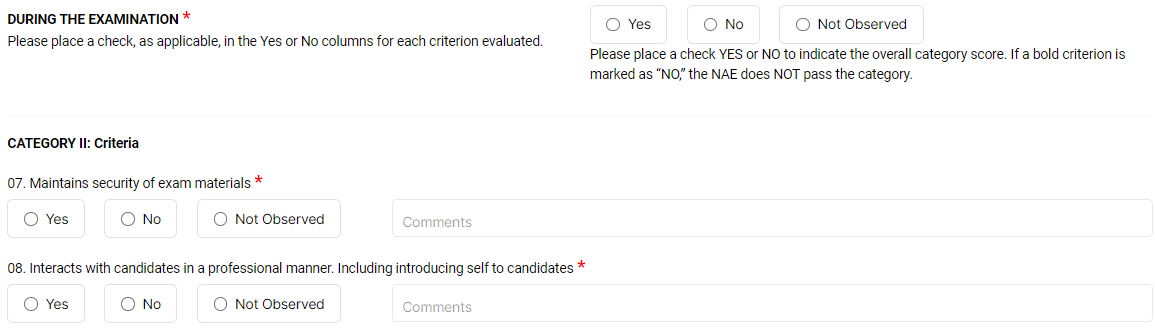
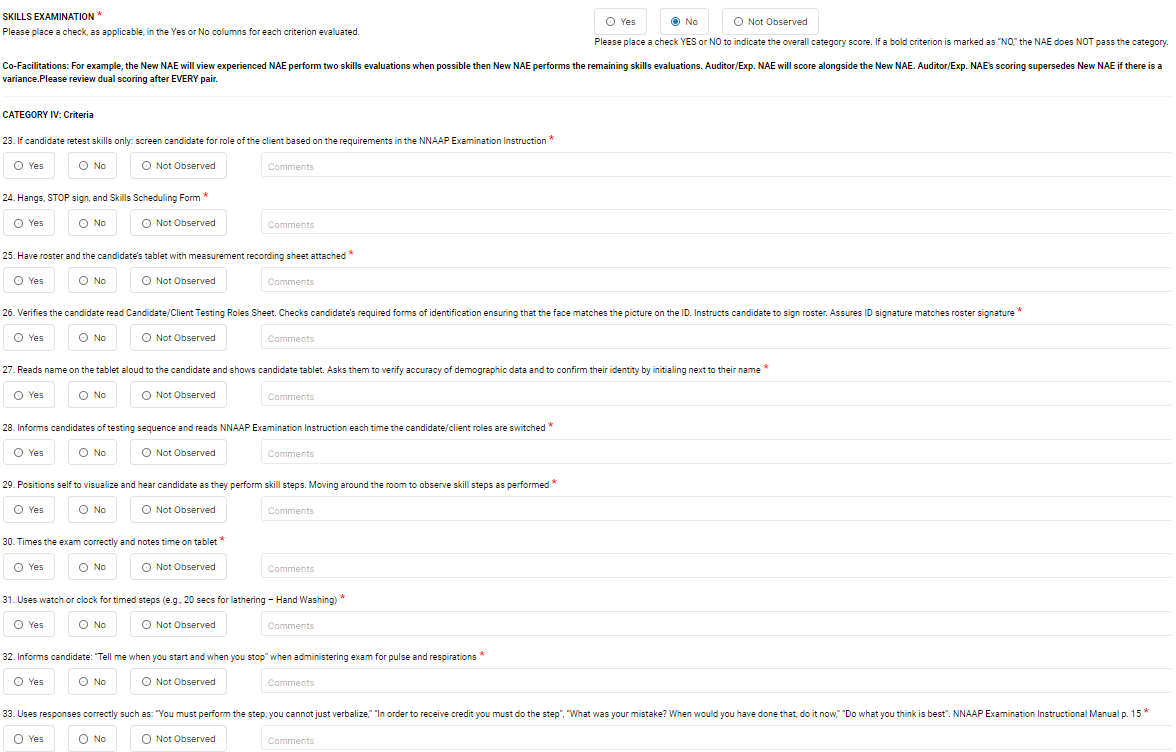
Note: Click Download 
Written Exam
This section provides instructions on how to perform proctoring for the written exam. To learn how to navigate to the Roster window and select the Event ID, refer to section Roster.
Preparing Exam Booklets and Answer Sheets
Each candidate is assigned an Answer Sheet (Booklet) linked to their unique Booklet ID for the Written Exam.
The Written Exam Booklets will be sent to the respective test centers in AK (Alaska), CO (Colorado), GA (Georgia), PA (Pennsylvania), and VA (Virginia). For SC (South Carolina), the booklets are sent directly to the assigned NAEs.
If the Physical copy is not available, you can download and print all required booklets in advance. In the candidate details section, you can download the Booklet before beginning the onboarding process.
Follow the steps to download the physical copy of the booklet for a candidate:
- Each candidate receives a dedicated Answer Sheet that includes their unique Booklet ID.
- Before starting the onboarding process, you can:
- Click the Download Booklet icon on each candidate's tile to download the required exam booklets in advance.
- Save the PDF files and print them as needed.
- This allows you to prepare and distribute all necessary booklets to candidates ahead of time, ensuring a smooth exam session.
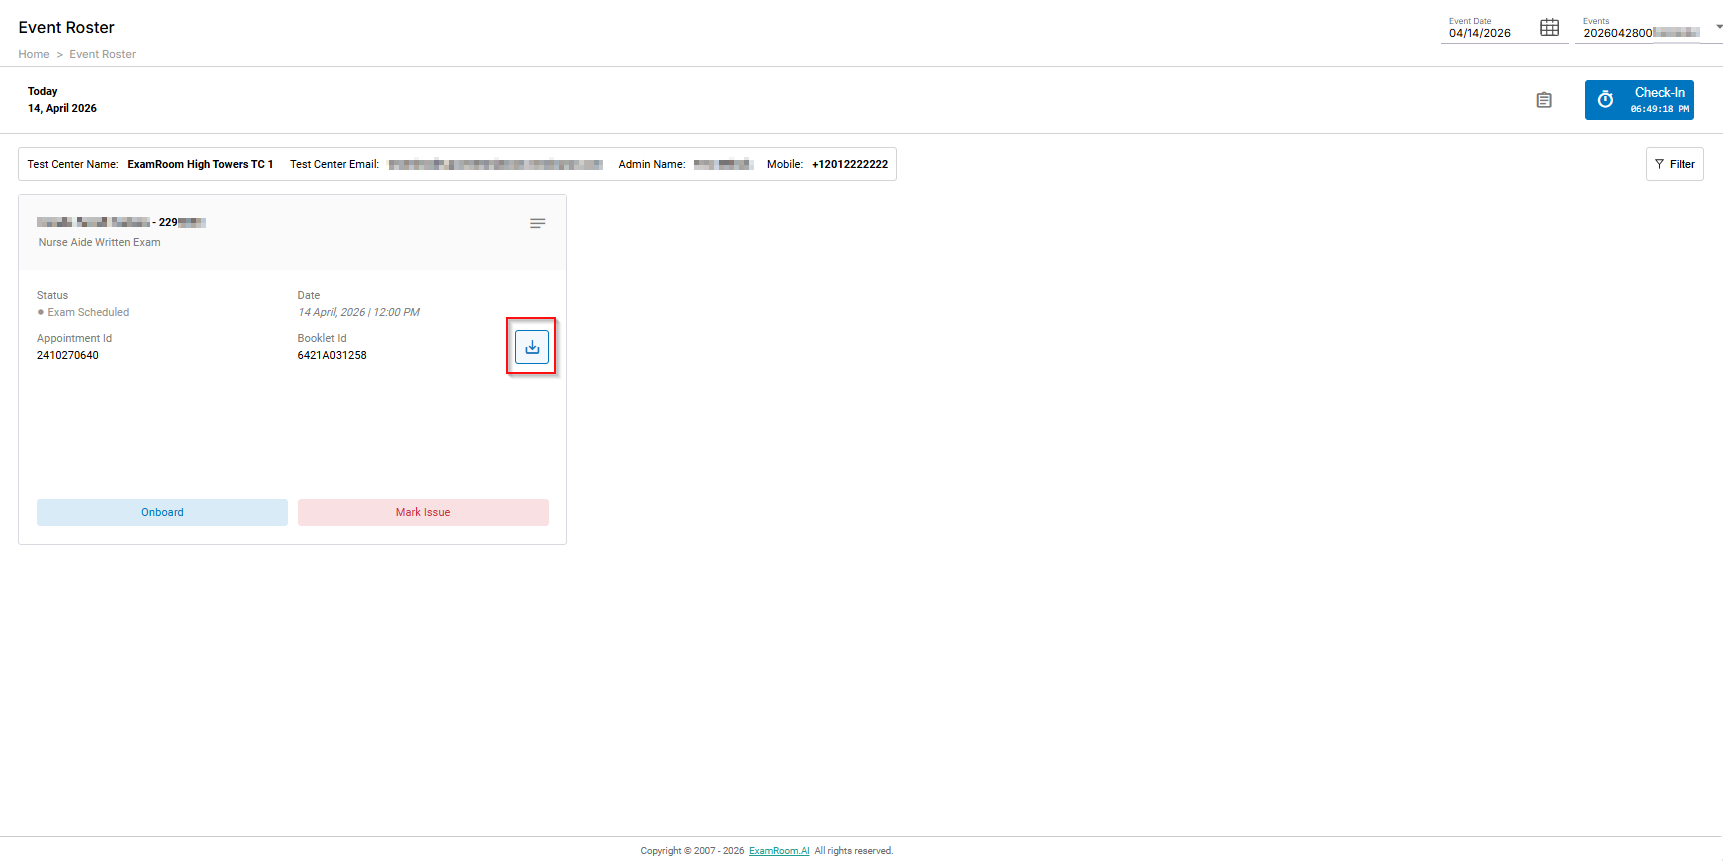
Marking an Issue
The Mark Issue button in the candidate tile lets you mark a candidate as absent or restrict them from taking an exam. Refer to section Marking an Issue for more information.
Onboarding the Candidate for the Written Exam
To onboard the candidate,
- Refer to section Onboarding the Candidate, for the initial steps of onboarding.
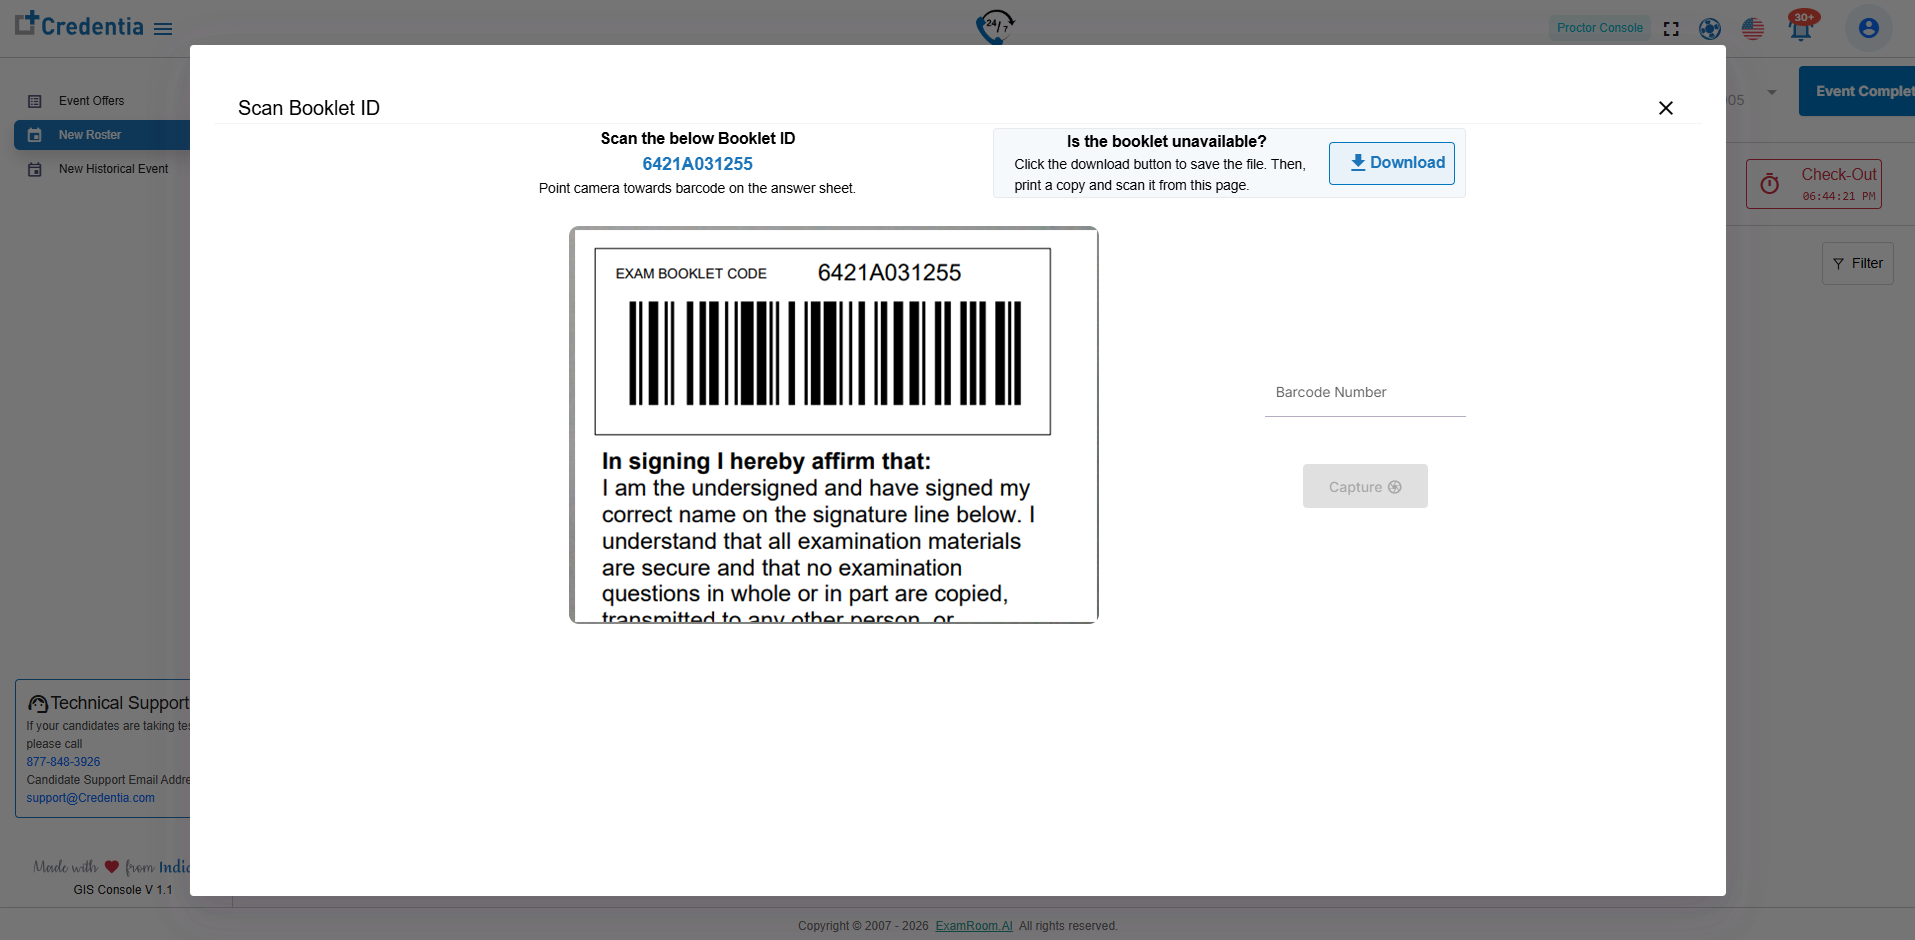
- In the onboarding pop-up window, for the written exam, you will find the Assign Booklet option to scan or capture the booklet ID.
- Click on the Capture button provided for Assign Booklet.
- Verify and scan the unique Booklet ID printed on the physical Answer Sheet assigned to the candidate being onboarded.
- If the Physical Booklet ID is unavailable, you can also download it from the scan booklet ID.
- If the Physical Booklet ID is unavailable, you can also download it from the scan booklet ID.
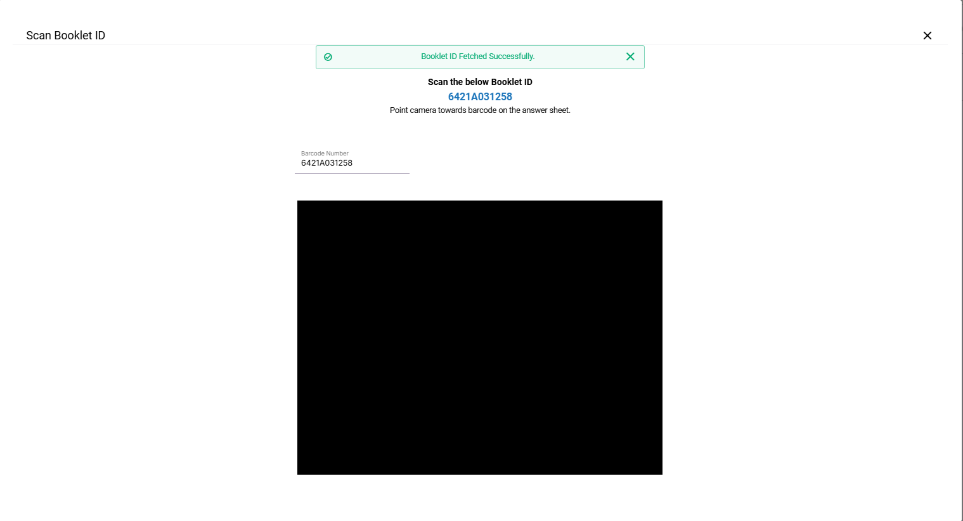
- Once the system fetches the booklet ID, it shows a successful notification.
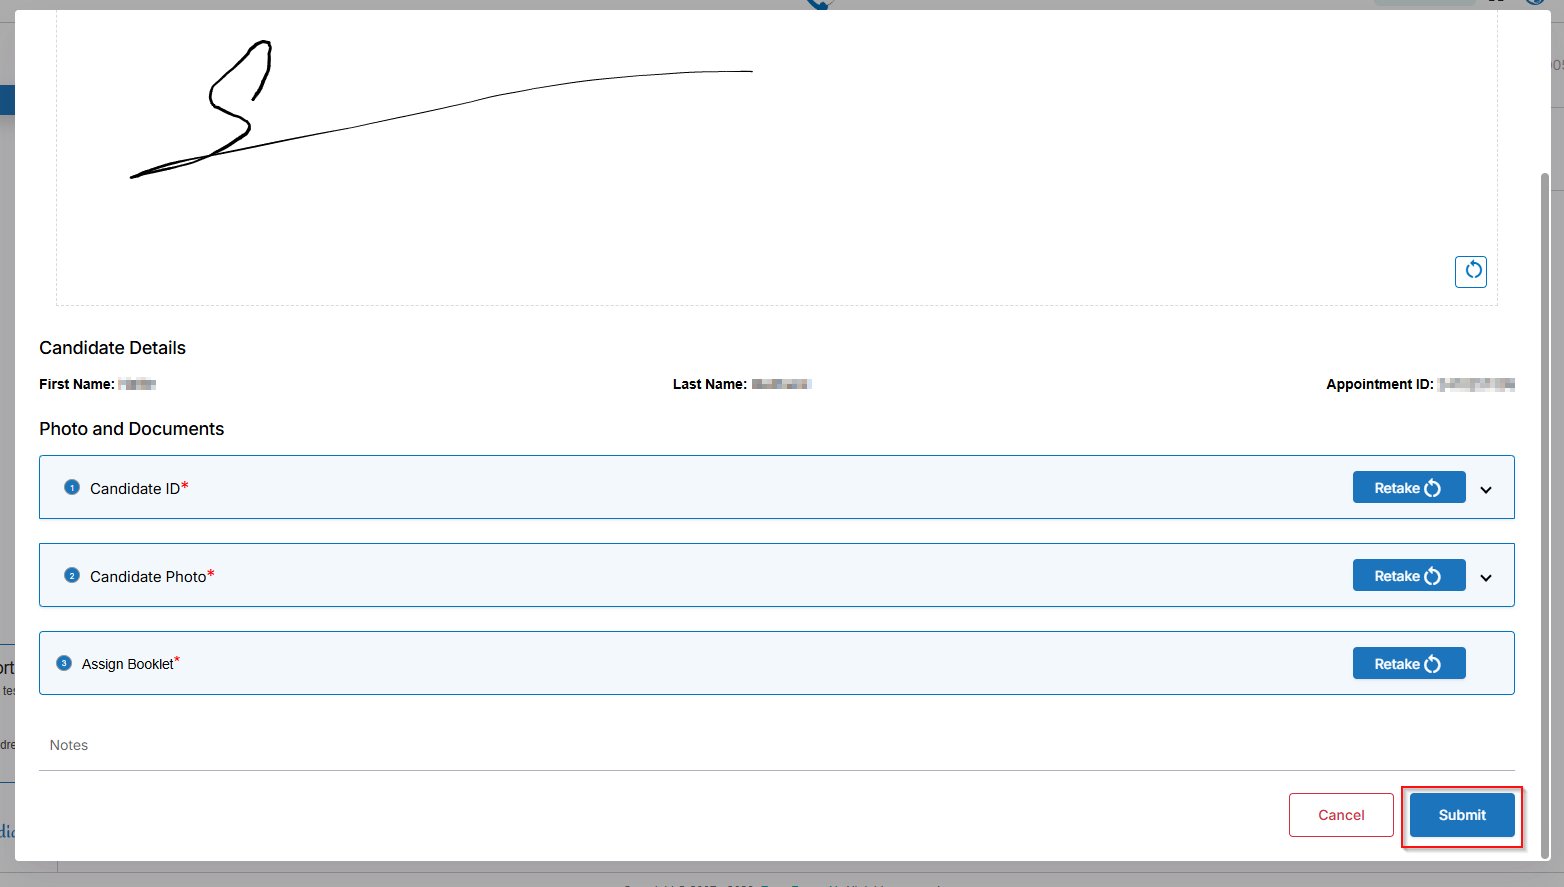
- After scanning the booklet, add the required Notes if necessary.
- Click Submit to proceed.
- Click on the Capture button provided for Assign Booklet.
- After the candidate's onboarding details are submitted and updated, distribute the booklet. After finishing all onboarding steps, you can proceed with the exam and proctoring process.
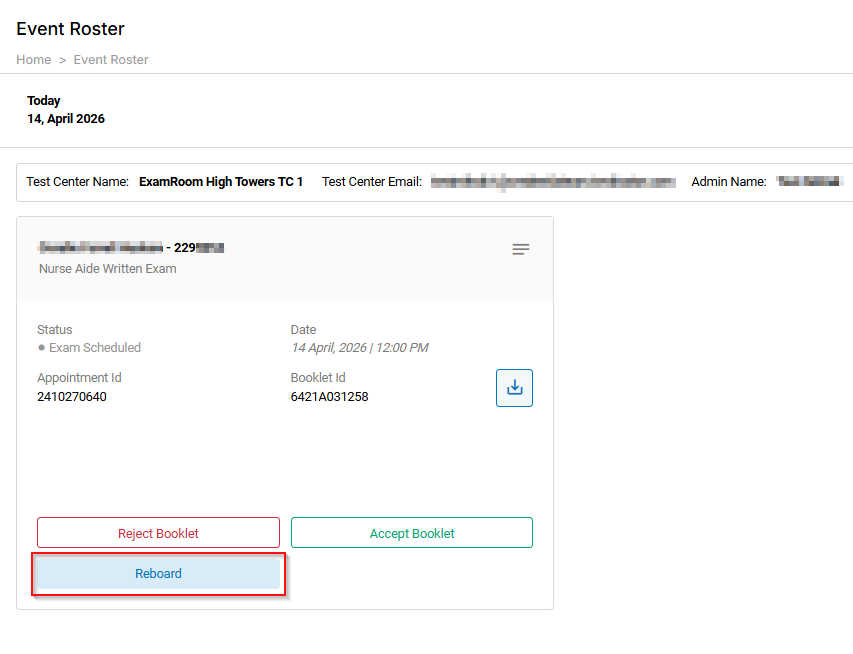
Note: If there is any issue with the onboarded candidate's details, you can click Reboard to restart their onboarding process. This will delete the initial onboarding details of the selected candidate.
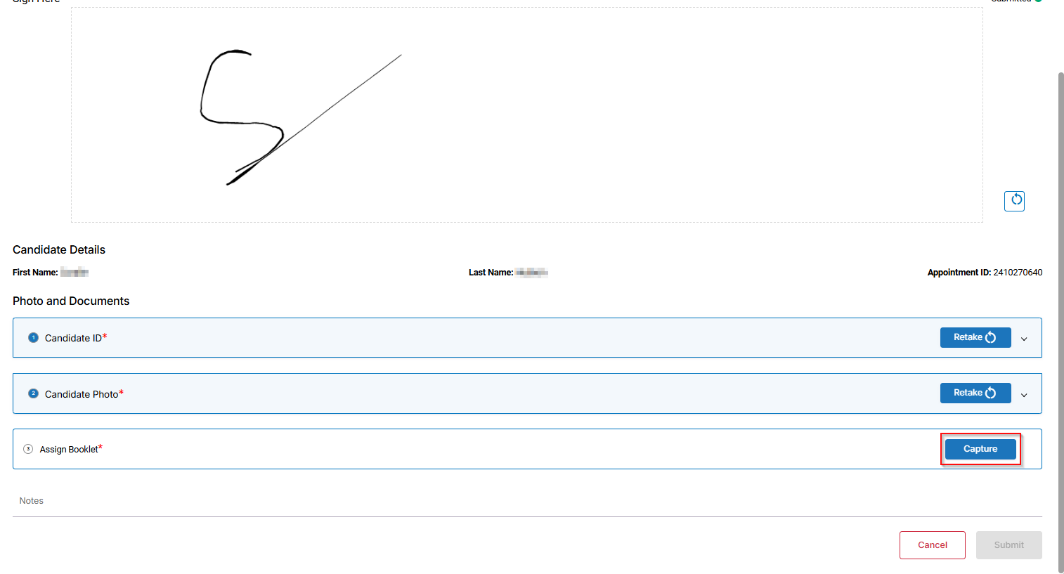
Proctoring
Once the booklet is distributed, the candidate details section will be changed with the following options:
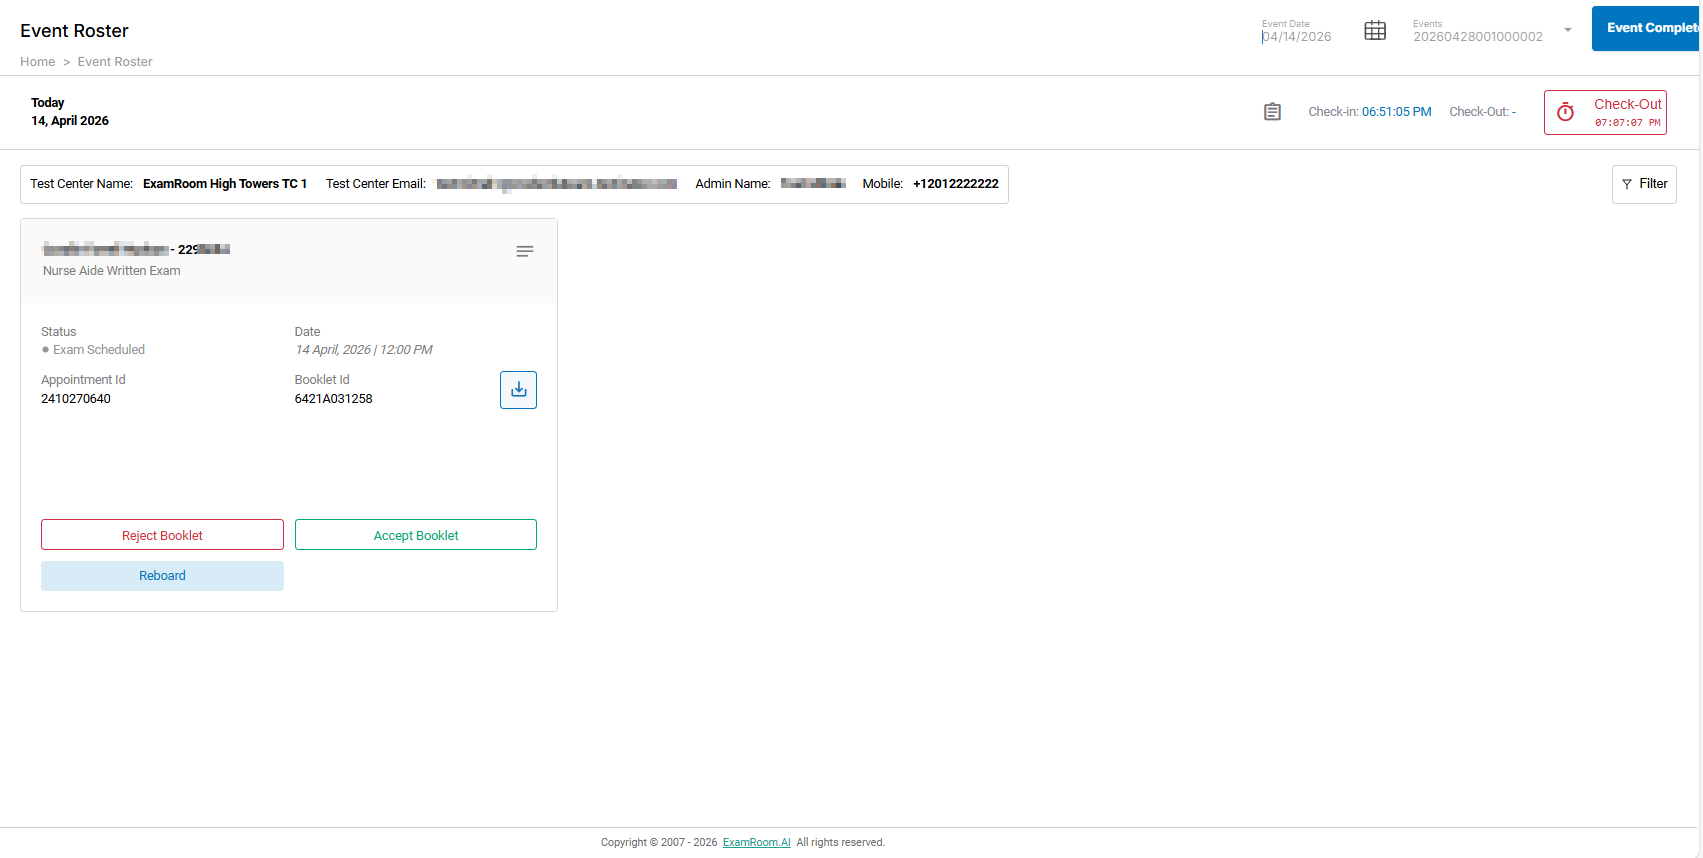
Reject Booklet
Use the Reject Booklet to reject if the candidate is cheating or has any health issues during the exam.
Accept Booklet
After completing the exam, you should collect the candidate's answer sheet and upload it.
Note: Before starting the upload process, make sure the candidate details, such as First Name, Last Name, Appointment ID, Date, and Signature, are filled in correctly.
To accept the booklet, follow these steps:
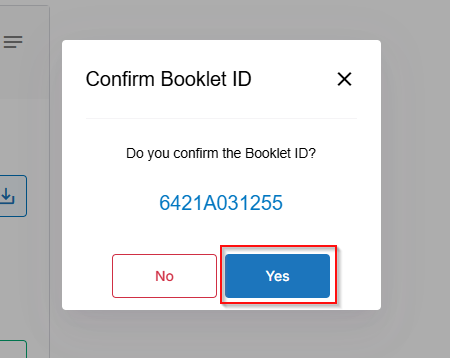
- Click the Accept Booklet button in the respective candidate details section.
- A pop-up will appear to confirm. Click the Yes button.
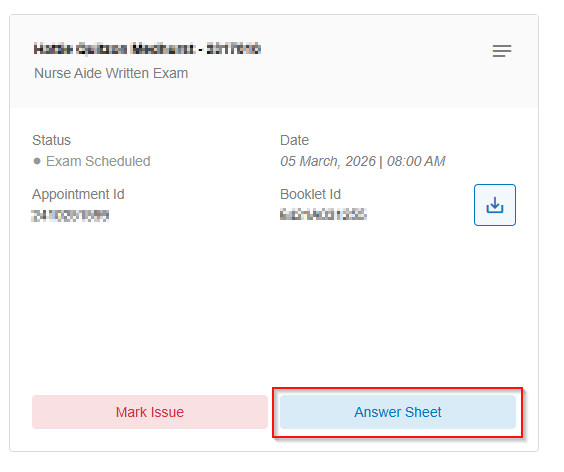
- Click the Mark Issue to Mark Issue for a candidate. Refer: Marking an Issue.
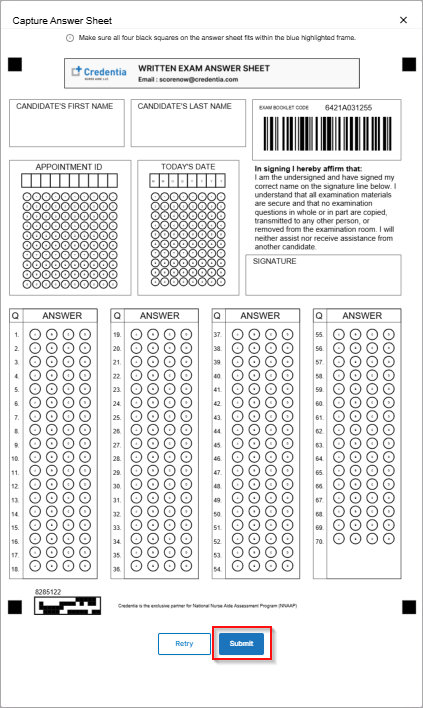
- Click Answer Sheet to proceed with the scan and upload.
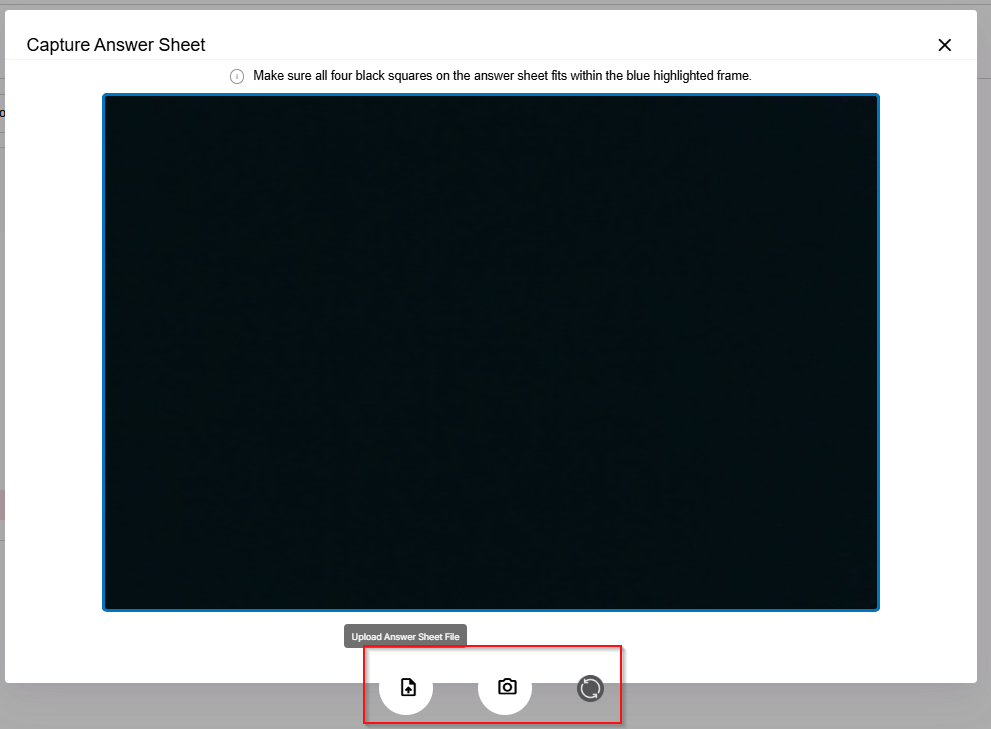
- Capture the Answer sheet of the candidate. Ensure the four corner squares of the answer sheet are completely inside the blue frame of the capturing area.
- Use the Switch Camera icon to switch between the back and front camera.
- Use the Capture icon to capture the answer sheet.
- Use the Upload icon to upload the answer sheet.
- Review the captured answer sheet and click Submit. Use Retry if you wish to recapture or reupload the answer sheet.
- Follow the same steps for all the candidates.
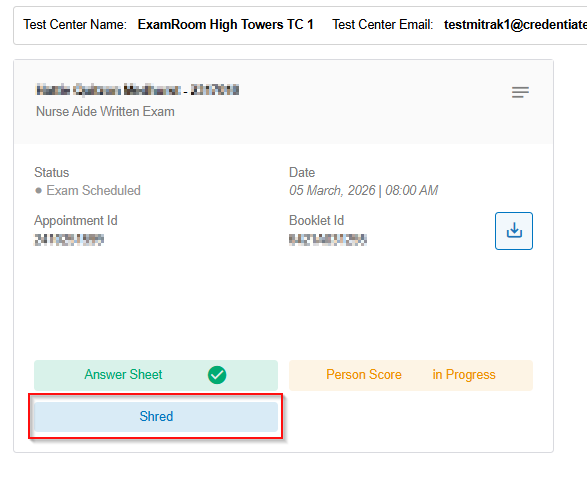
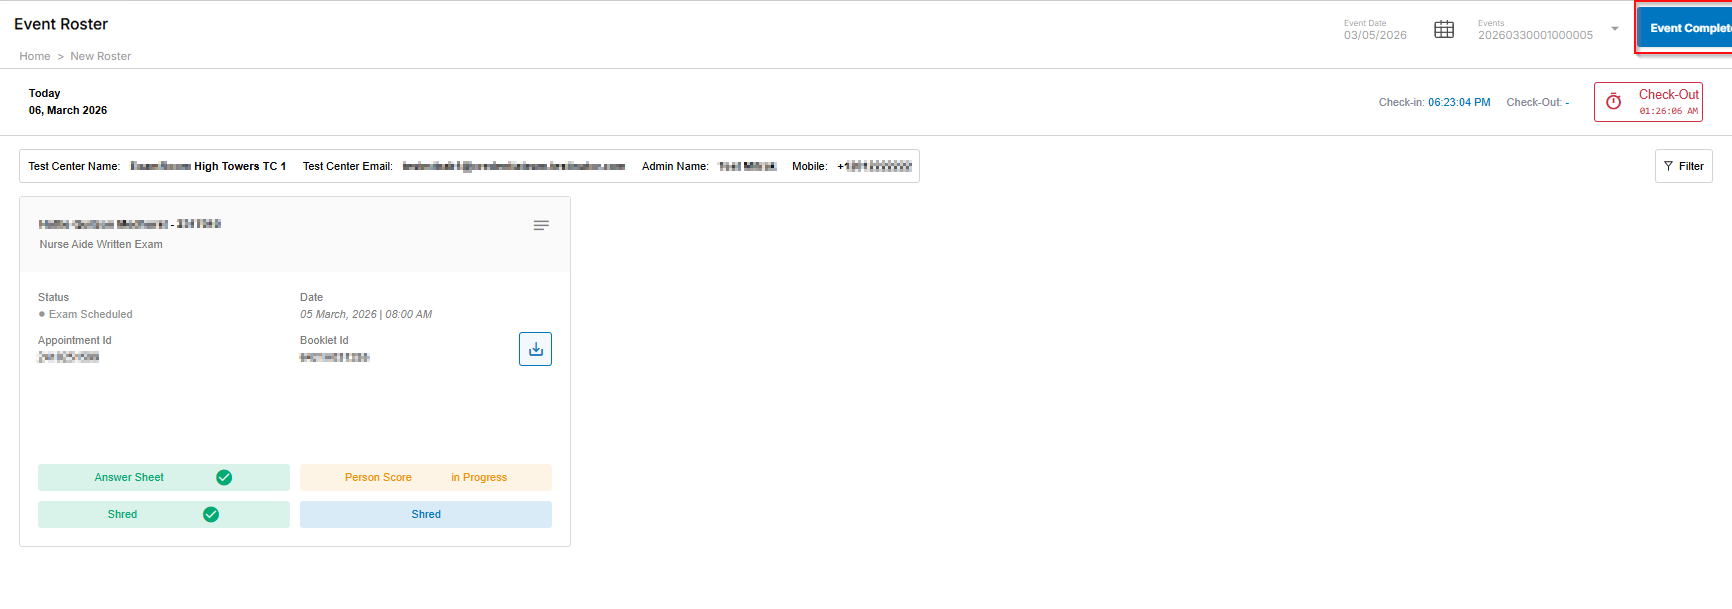
Note: The checkmark in the Answer Sheet confirms that the answer sheet has been uploaded, and the Person Score section displays the candidate's scored status.
Shredding the Answer Sheet
After uploading the answer sheet, securely shred it.
Note: Start the shredding process after uploading all candidates' answer sheets.
To shred the answer sheet, follow these steps:
- Once the answer sheet is uploaded successfully, the candidate details section will display the Shred option.
- Click Shred to start the shredding process.
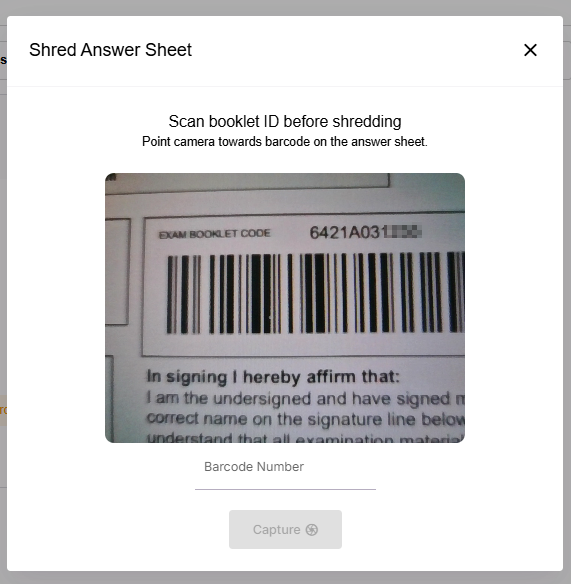
- A pop-up will appear to request access to the camera. Click Allow to access the camera.
- You can either scan the bar code in the booklet or enter the Booklet ID in the Bar Code field.
- Click Capture.
- Record the shredding of the answer sheet. Verify the Booklet ID of the answer sheet is visible in the recording.
- Click Submit.
- Follow the same steps for all the candidates to shred the answer sheet.
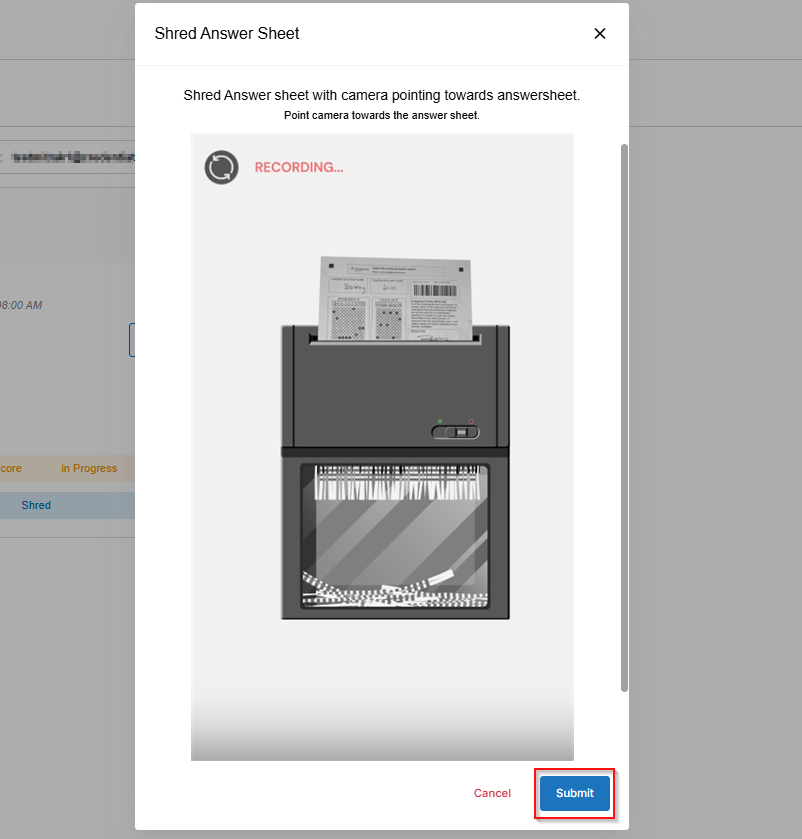
Note: The checkmark in the shred indicates that the shredding process is complete completed.
Event Complete
Once you complete the proctoring process for all the candidates, click Event Complete to complete the event.
View Completed Events (Historical Events)
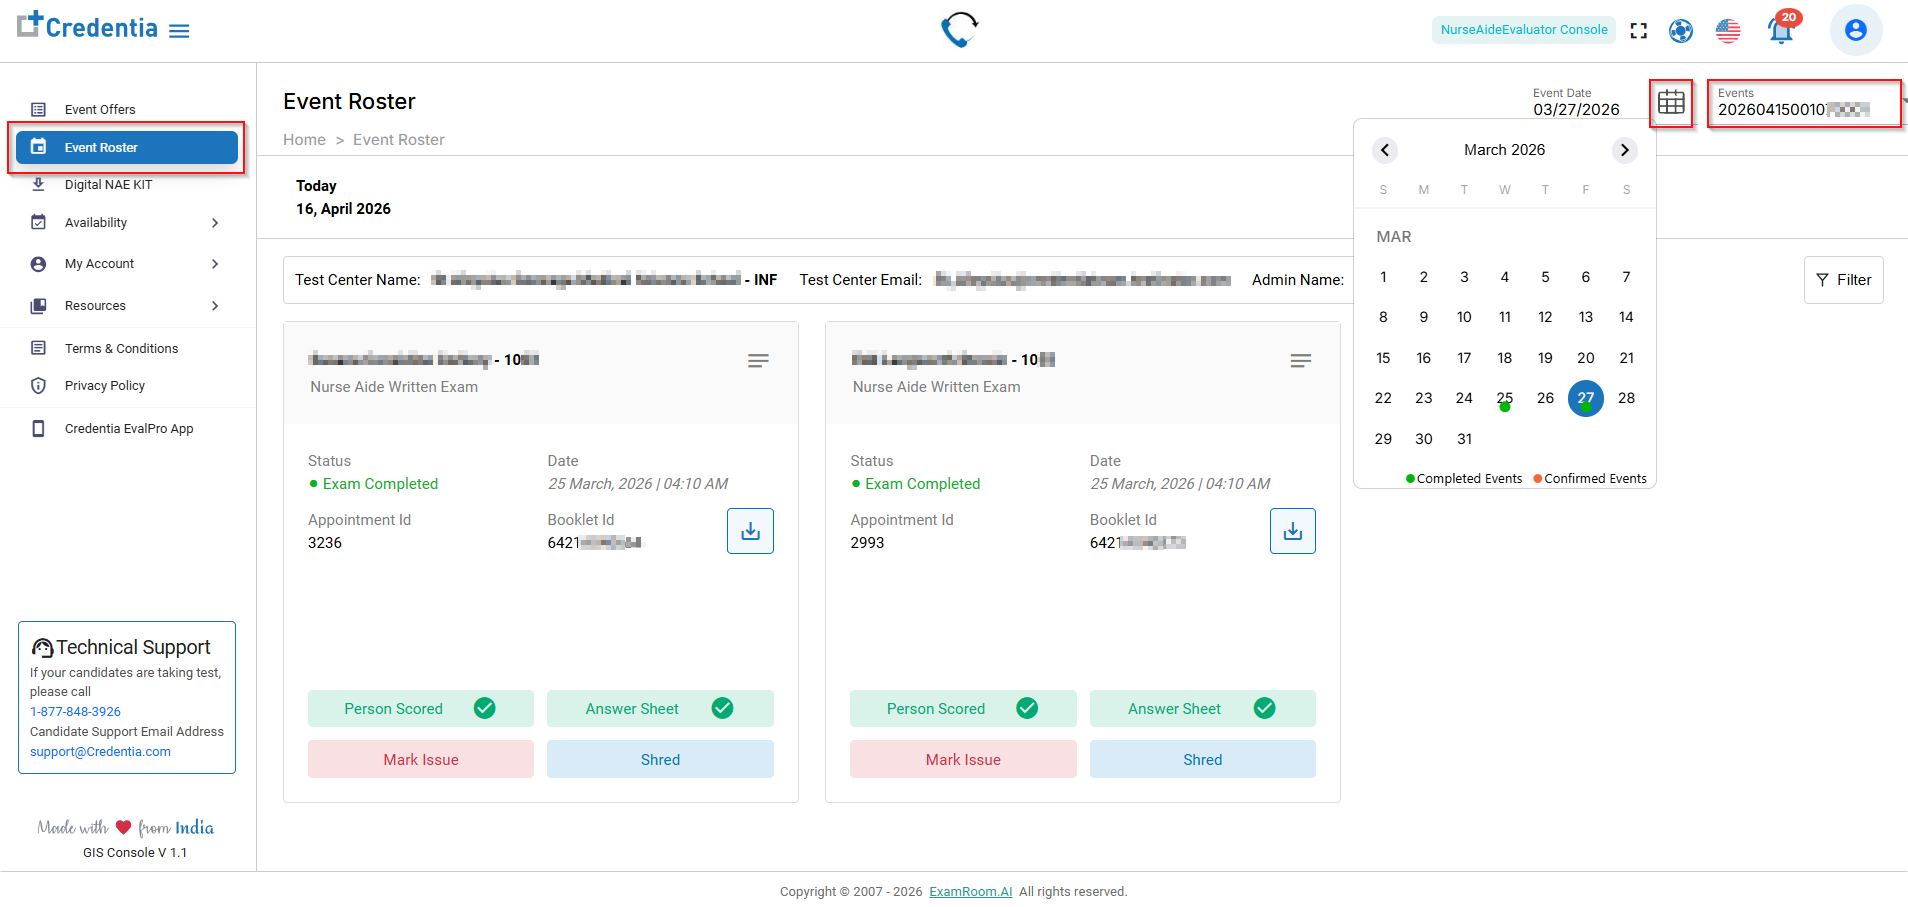
In the Event Roster section, you can also view events from previous dates that were completed previously. You can filter these events by selecting a specific backdated date.
To view the completed event, follow these steps:
- Select Event Roster from the dropdown in the left navigation menu.
- Click the
Calendar icon and select the desired backdated date in the Event Date section.
- The calendar will include a color marker to indicate days with scheduled(your Confirmed events) and your completed events.
- Select the Event ID from the dropdown menu next to the calendar icon.
- If there is no event scheduled for that date, the section will display 'No Event' status.
- If there is no event scheduled for that date, the section will display 'No Event' status.
Note:
- Test Center Name displays the test center name where the test was conducted.
- Click Update Notes to update the notes and comment section on the validation page.